


Creating Custom Apache Superset Assets Programmatically with Preset


This is the second post in our blog series that showcases the workflow of managing Superset databases, datasets, charts, and dashboards as code. In the first post, Managing Apache Superset Assets as Code with Preset, I walked through a basic end-to-end workflow of managing Superset (or Preset) assets like databases, datasets, charts, and dashboards in version control. In this post, I'll extend this basic workflow to showcase how to customize these assets using code.
Building bespoke dashboards
One of the main benefits of using Preset is that it’s really easy to deploy multiple workspaces, each one a completely independent instance of Apache Superset. This allows you to quickly create different workspaces for different teams or customers. You can customize which data each team has access to, either configuring a different database for each Preset workspace, using row-level security, or customizing virtual datasets.
While the data might be different for each of the workspaces, a common pattern is to have the same set of dashboards shared across them, so that each team has access to the same visualizations in their workspace — although built from different data. For example, each workspace might have a dashboard showing sales metrics for a given store, and each store would only have access to its own workspace, being able to see only their numbers.
Managing those dashboards across multiple workspaces can be cumbersome, even using something like the import/export functionality of Superset. Since we want to produce custom assets from a single source of truth, we have a perfect use case for the Preset CLI that we’ve been covering in the latest few blog posts.
In this post we’ll explore how to customize Superset assets (databases, datasets, charts, dashboards) that are managed in source control, so they can be synchronized differently to multiple workspaces. This will allow you to build bespoke dashboards in your workspaces from a set of templates. If you’d like to follow along with the examples you can clone this GitHub repository with all the files used in the blog post.
Note that access to the Preset CLI is requires access to our Enterprise plan.
Customizing databases
One of the easiest way of customizing the data that each workspace has access to is by defining a different database connection string (a SQLAlchemy URI, for Superset) for each one. For this, we’re going to start with a simple database, defined in YAML:
# white-label-blog-post-examples/example1/databases/postgres.yaml
database_name: A Postgres database
sqlalchemy_uri: postgresql://username:password123@localhost:5432/examples
cache_timeout: null
expose_in_sqllab: true
allow_run_async: false
allow_ctas: true
allow_cvas: true
allow_file_upload: true
extra:
  engine_params: {}
  metadata_params: {}
  schemas_allowed_for_file_upload: []
uuid: 7737158f-bce3-4350-a2dc-85ca6a2998a0
version: 1.0.0
(This is the same format that Superset uses for its imports and exports.)
If we want to create or update this database in our workspaces we can do it with a single command using the Preset CLI (see in this blog post how to install and use the CLI):
% preset-cli superset sync native white-label-blog-post-examples/example1/This should prompt you for the workspaces to where database should be installed:
Choose one or more workspaces (eg: 1-3,5,8-):

# Team 1 #
✅ (1) The Data Lab
🚧 (2) New workspace

# Dev #
⤴️ (3) Test workspace
Typing - will apply the command to all your workspaces, our can choose any subset. Alternatively, you can also specify the workspaces by URL in the command line using the --workspaces flag and passing a comma-separated list of workspaces:
% preset-cli --workspaces=https://ws1.region.app.preset.io,https://... \
> superset sync native white-label-blog-post-examples/example1/
While this is useful by itself, it can be even more powerful if we customize the database file so that each workspace connects to a different database. We’re going to use Jinja2 for that, a powerful templating language that is also used by dbt, Apache Airflow, Ansible, and other projects. Let’s change our database YAML file so that the sqlalchemy_uri is dependent on the workspace. This can be done by using the instance variable:
# white-label-blog-post-examples/example2/databases/postgres.yaml
database_name: A Postgres database
{% if instance.host == "ws1.region.app.preset.io" %}
sqlalchemy_uri: postgresql://username:password123@db1:5432/examples
{% elif instance.host == "ws2.region.app.preset.io" %}
sqlalchemy_uri: postgresql://username:password123@db2:5432/examples
{% else %}
{{ raise("Workspace %s has no database configured", instance) }}
{% endif %}
cache_timeout: null
...
In the example above we’re assigning the database at db1 to workspace ws1, and db2 to ws2. For safety, if the workspace is not one of those two we raise an error message using the raise helper, preventing us from connecting a third workspace to an unintended database.
While this works, the YAML file above is hard to read and might get too big if the number of workspaces is high. There’s a cleaner way of achieving the same result, by defining a custom function:
# white-label-blog-post-examples/example3/functions/databases.py
import yarl
from sqlalchemy.engine.url import URL

def get_sqlalchemy_uri(instance: yarl.URL) -> str:
    """
    Given a Preset workspace, return its SQLAlchemy URI.
    """
    hostnames = {
        "ws1.region.app.preset.io": "db1",
        "ws2.region.app.preset.io": "db2",
    }
    if instance.host not in hostnames:
        raise Exception(f"Invalid workspace: {instance}")

    url = URL(
        "postgresql",
        username="username",
        password="password123",
        host=hostnames[instance.host],
        port=5432,
        database="examples",
    )
    return str(url)
Now we can simply call the new function in the template:
# white-label-blog-post-examples/example3/databases/postgres.yaml
database_name: A Postgres database
sqlalchemy_uri: {{ functions.databases.get_sqlalchemy_uri(instance) }}
cache_timeout: null
...Note that instead of connecting each workspace to databases running in different hosts we could easily change our function so that they connect to different databases in the same host; or we could connect with a different set of credentials (username/password in this example). We could even have workspaces connect different database types, with one connecting to Postgres and another connecting to BigQuery, for example!
Adding templating logic to a database is the easiest way to build custom dashboards, since all the other assets — datasets, charts, and dashboards — are built on top of databases. But let’s look at how we can customize these other assets.
Customizing datasets
The same logic can be applied to datasets. Imagine the following scenario: you have a single database, with the data for each of your teams or customers in a separate table. For example, you could have a table team1_sales, team2_sales, and so on. We can create a dataset YAML file that handles this for us:
# white-label-blog-post-examples/example4/datasets/A_Postgres_database/sales.yaml
table_name: {{ functions.utils.get_team(instance) }}_sales
description: Sales data for team {{ functions.utils.get_team(instance) }}
database_uuid: 7737158f-bce3-4350-a2dc-85ca6a2998a0
...
This depends on a hypothetical function called get_team that returns the team name (”team1”) given the workspace URL.
Now, when we run the sync command all workspaces will connect to the same database, and each one will have a dataset called “sales”. But in each workspace the dataset will point to a different table in the database, so charts and dashboards built on top of the dataset will be different in each workspace.
While this example assumes that each team has its own table, we can use a similar approach when there’s only a single table. This is best done using row-level security (RLS), but we’ll show how to do something similar using a virtual dataset:
# white-label-blog-post-examples/example5/datasets/A_Postgres_database/sales.yaml
table_name: sales  # single table for sales
description: Sales data
sql: >
  SELECT * FROM public.sales
  {% if instance.host == "ws1.region.app.preset.io" %}
  WHERE team_id = 42
  {% elif instance.host == "ws2.region.app.preset.io" %}
  WHERE team_id = 43
  {% else %}
  WHERE 1 = 0
  {% endif %}
database_uuid: 7737158f-bce3-4350-a2dc-85ca6a2998a0
...
The configuration file above will create a virtual dataset called “sales” in each workspace. In workspace ws1 the dataset is defined by the following query:
SELECT * FROM public.sales
WHERE team_id = 42
Workspace ws would get WHERE team_id = 43. For a workspace that is neither ws1 or ws2, on the other hand, the query will return no data:
SELECT * FROM public.sales
WHERE 1 = 0
Note that this approach is not secure by default! If you have not configured RLS users will have access to the whole table, and should be able to create a new dataset without the team_id predicate — and if you have configured it the predicate will be added automatically to every query. Customizing virtual datasets like this should only be done when users can have access to all of the data.
Customizing charts
Another useful target for customization are charts. The chart YAML config has information about the chart title, its type (line, bar, pie, etc.), the dataset from which it’s built, and any adhoc filters that are applied to the dataset. Any one of these can be configured using Jinja2. For example, to change the chart title all we have to do this:
# white-label-blog-post-examples/example6/charts/sales_per_.yaml
slice_name: {{ functions.utils.get_chart_title(instance, 'pie') }}
viz_type: pie
dataset_uuid: fe3bd066-ab04-4ab8-a89a-30bf3d8423b4
params:
  ...
cache_timeout: null
uuid: 3f966611-8afc-4841-abdc-fa4361ff69f8
version: 1.0.0
Here we’re using a hypothetical function get_chart_title, which returns the title given a workspace URL and a parameter (”pie”, in this example).
Another useful example is customizing the filters in the chart depending on the workspace. Like in the previous example with virtual datasets this can only be done when users have access to all of the data in a table, and serves only as a convenience to pre-filter the data. Customizing the filter means that each workspaces sees at first the data that is relevant to them (say, their own sales data), while still allowing users to change the filter and see the data for other workspaces.
To do this, we just need to set up an adhoc_filter in the chart config:
# white-label-blog-post-examples/example6/charts/sales_per_team.yaml
slice_name: {{ functions.utils.get_chart_title(instance, 'pie') }}
viz_type: pie
dataset_uuid: fe3bd066-ab04-4ab8-a89a-30bf3d8423b4
params:
  adhoc_filters:
  - clause: WHERE
    comparator: null
    expressionType: SQL
    filterOptionName: filter_osfx5u3a5ks_qu7tlefn04j
    isExtra: false
    isNew: false
    operator: null
    sqlExpression: team_id = {{ functions.utils.get_team_id(instance) }}
    subject: null
  ...
cache_timeout: null
uuid: 3f966611-8afc-4841-abdc-fa4361ff69f8
version: 1.0.0
Now, each workspace will initially load the chart with the corresponding filter:
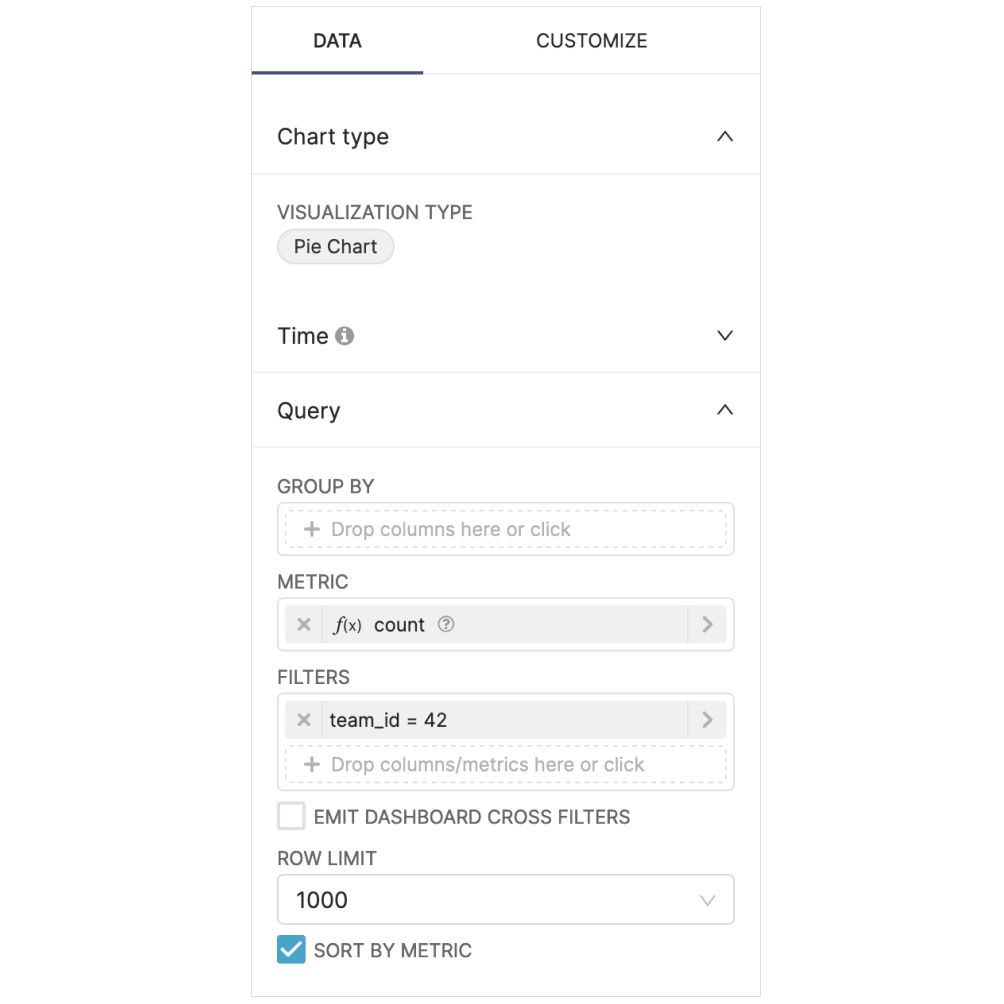
Users are then able to change the filter (or remove it completely) to look at the data from different teams. Note that this assumes that the dataset has a column called team_id that is used to partition the data between teams.
Customizing dashboards
Finally, we can use the same approach to customize dashboards. Most of the customization for dashboards should be done at a lower level — by adding templating logic to the database, the datasets, or the charts — but we can still customize some visual aspects of the dashboards. There are two examples where this can be particularly useful.
The first example is straightforward: we can customize the title of a dashboard. Looking at the YAML config for a dashboard, all we need to do is to add Jinja2 logic to the dashboard_title attribute:
# white-label-blog-post-examples/example7/dashboards/sales.yaml
dashboard_title: Sales for team {{ functions.utils.get_dash_title(instance) }}
description: Dashboard with all the sales
uuid: c64ca0c9-5cdf-46d8-a0b2-7b269b10f36c
position:
  ...
A more interesting example is configuring a Markdown widget on the dashboard. If we create a dashboard with a Markdown widget and export, the generated YAML will look something like this:
# white-label-blog-post-examples/example7/dashboards/sales.yaml
...
position:
  MARKDOWN-zoeFoIPU66:
    children: []
    id: MARKDOWN-zoeFoIPU66
    meta:
    code: '# Markdown

        This is some markdown context.'
    height: 50
    width: 4
    parents:
    - ROOT_ID
    - GRID_ID
    - ROW-N-OZVI6W96
    type: MARKDOWN
  ...
The codesection can be easily customized with Jinja2 logic to customize the dashboard. This can include links, images, anything that can be expressed as Markdown or even HTML. For example we could include in the dashboard a link to a custom logo, different for each workspace:
# white-label-blog-post-examples/example8/dashboards/sales.yaml
...
position:
  MARKDOWN-zoeFoIPU66:
    children: []
    id: MARKDOWN-zoeFoIPU66
    meta:
    code: >
      <img src="{{ functions.utils.get_image(instance) }}" alt="Logo" />
    height: 50
    width: 4
    parents:
    - ROOT_ID
    - GRID_ID
    - ROW-N-OZVI6W96
    type: MARKDOWN
  ...
Note that depending on the size of the contents you might need to adjust the height and the width of the element, which might require some trial-and-error.
Final words
In this blog post we used a few synthetic examples to show how to use the Preset CLI and Jinja2 templates to customize assets in different Preset workspaces. While configuring the database for each workspace is the easiest (since everything else builds on them) and most secure (since it prevents unauthorized data access) way, we also demonstrated how to configure datasets, charts, and dashboards.
If you want to give this a try, all the examples used in this post can be downloaded from a GitHub repository. You can also try with your own data; the easiest way is to build one or more dashboards inside a Superset instance and export the dashboards from there. The export will be a single ZIP file, that when unpacked will reveal the YAML files for databases, datasets, charts, and dashboards. Those files can then be modified with any templating logic that you can think of.
