


Github Actions and AWS Fargate - Github Actions ECR


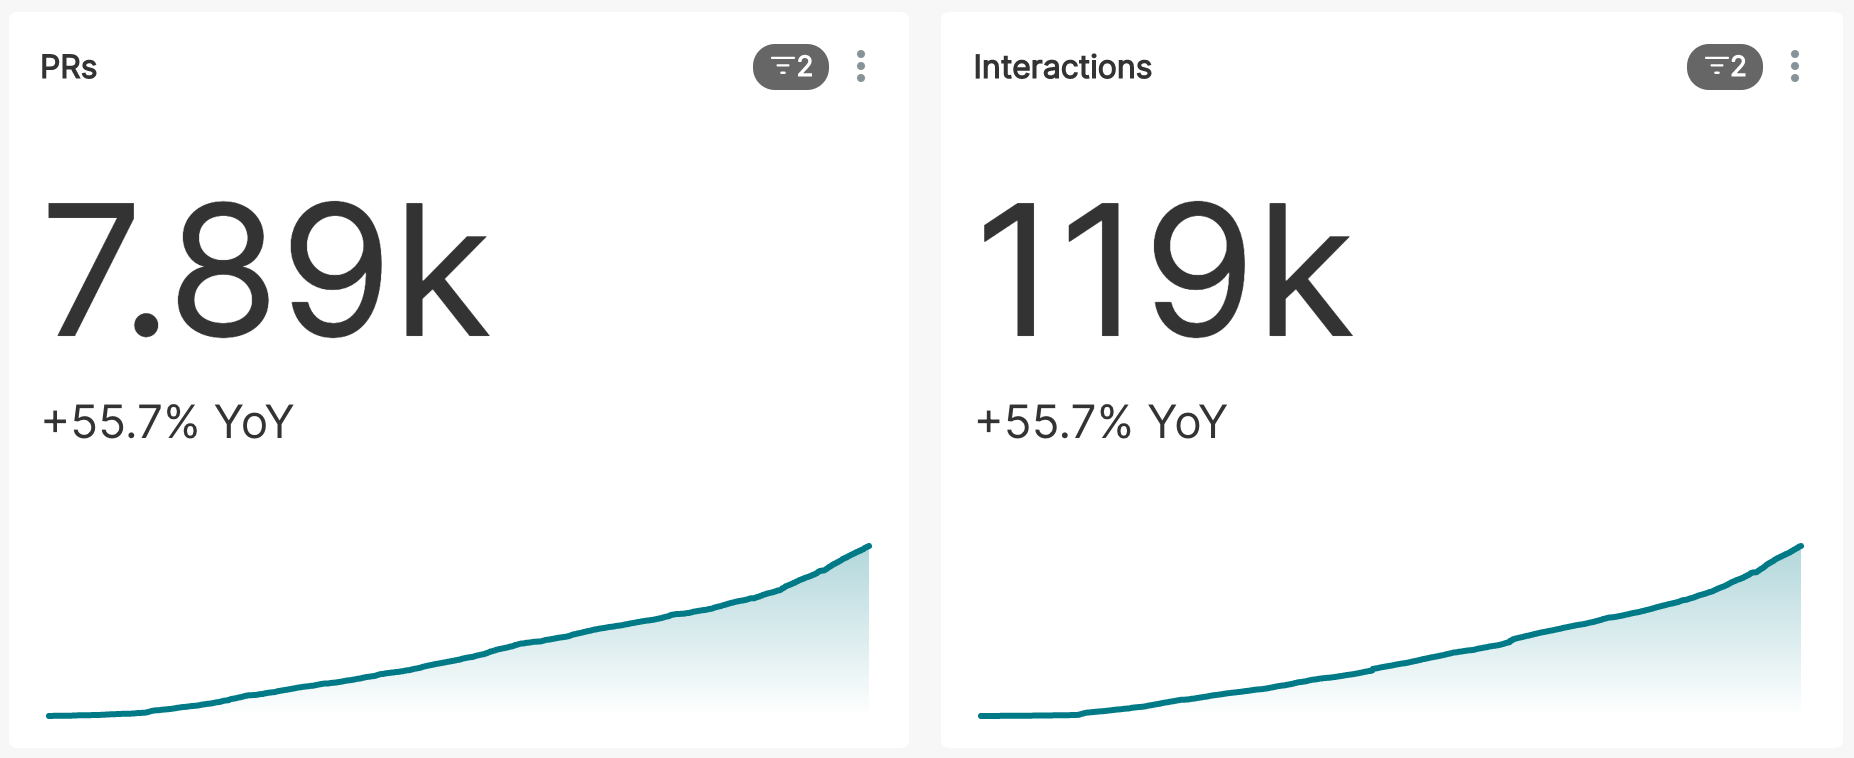
Apache Superset™ has a high volume of contributions and a growing number of contributors. As a popular open source project, the rate of change in the codebase is quite high. As the project matures, it's important to maintain a high quality bar and to prevent regressions from the growing number of contributions. There are a few ways in which the Superset community is tackling this problem.
- Increasing automated test coverage. We've doubled-down on filling in the gaps on test coverage in Superset, and have added new tools such as React Testing Library to our continuous integration (CI) workflow.
- Introducing TypeScript and Python typing into the codebase, as well as standardizing and enforcing design patterns and semantic versioning to keep our code well structured, easier to maintain and stable.
While automated testing has gone a long way in maintaining a high quality level in the Superset codebase, there are many cases, particularly in the UI, where a change requires human eyes. For these cases, we've introduced the ability to spin up an ephemeral test environment directly from a pull request in the Superset GitHub repository. The ability to test code directly from a PR greatly reduces manual testing overhead by eliminating the need to checkout the branch and run the code locally in a development environment.
GitHub Actions
Superset started using GitHub Actions for continuous integration workflows in 2020. For each commit, we automatically run a suite of tests and linting workflows to prevent regressions and keep the code quality high. We also perform tasks like building Docker images and pushing them to Docker Hub.
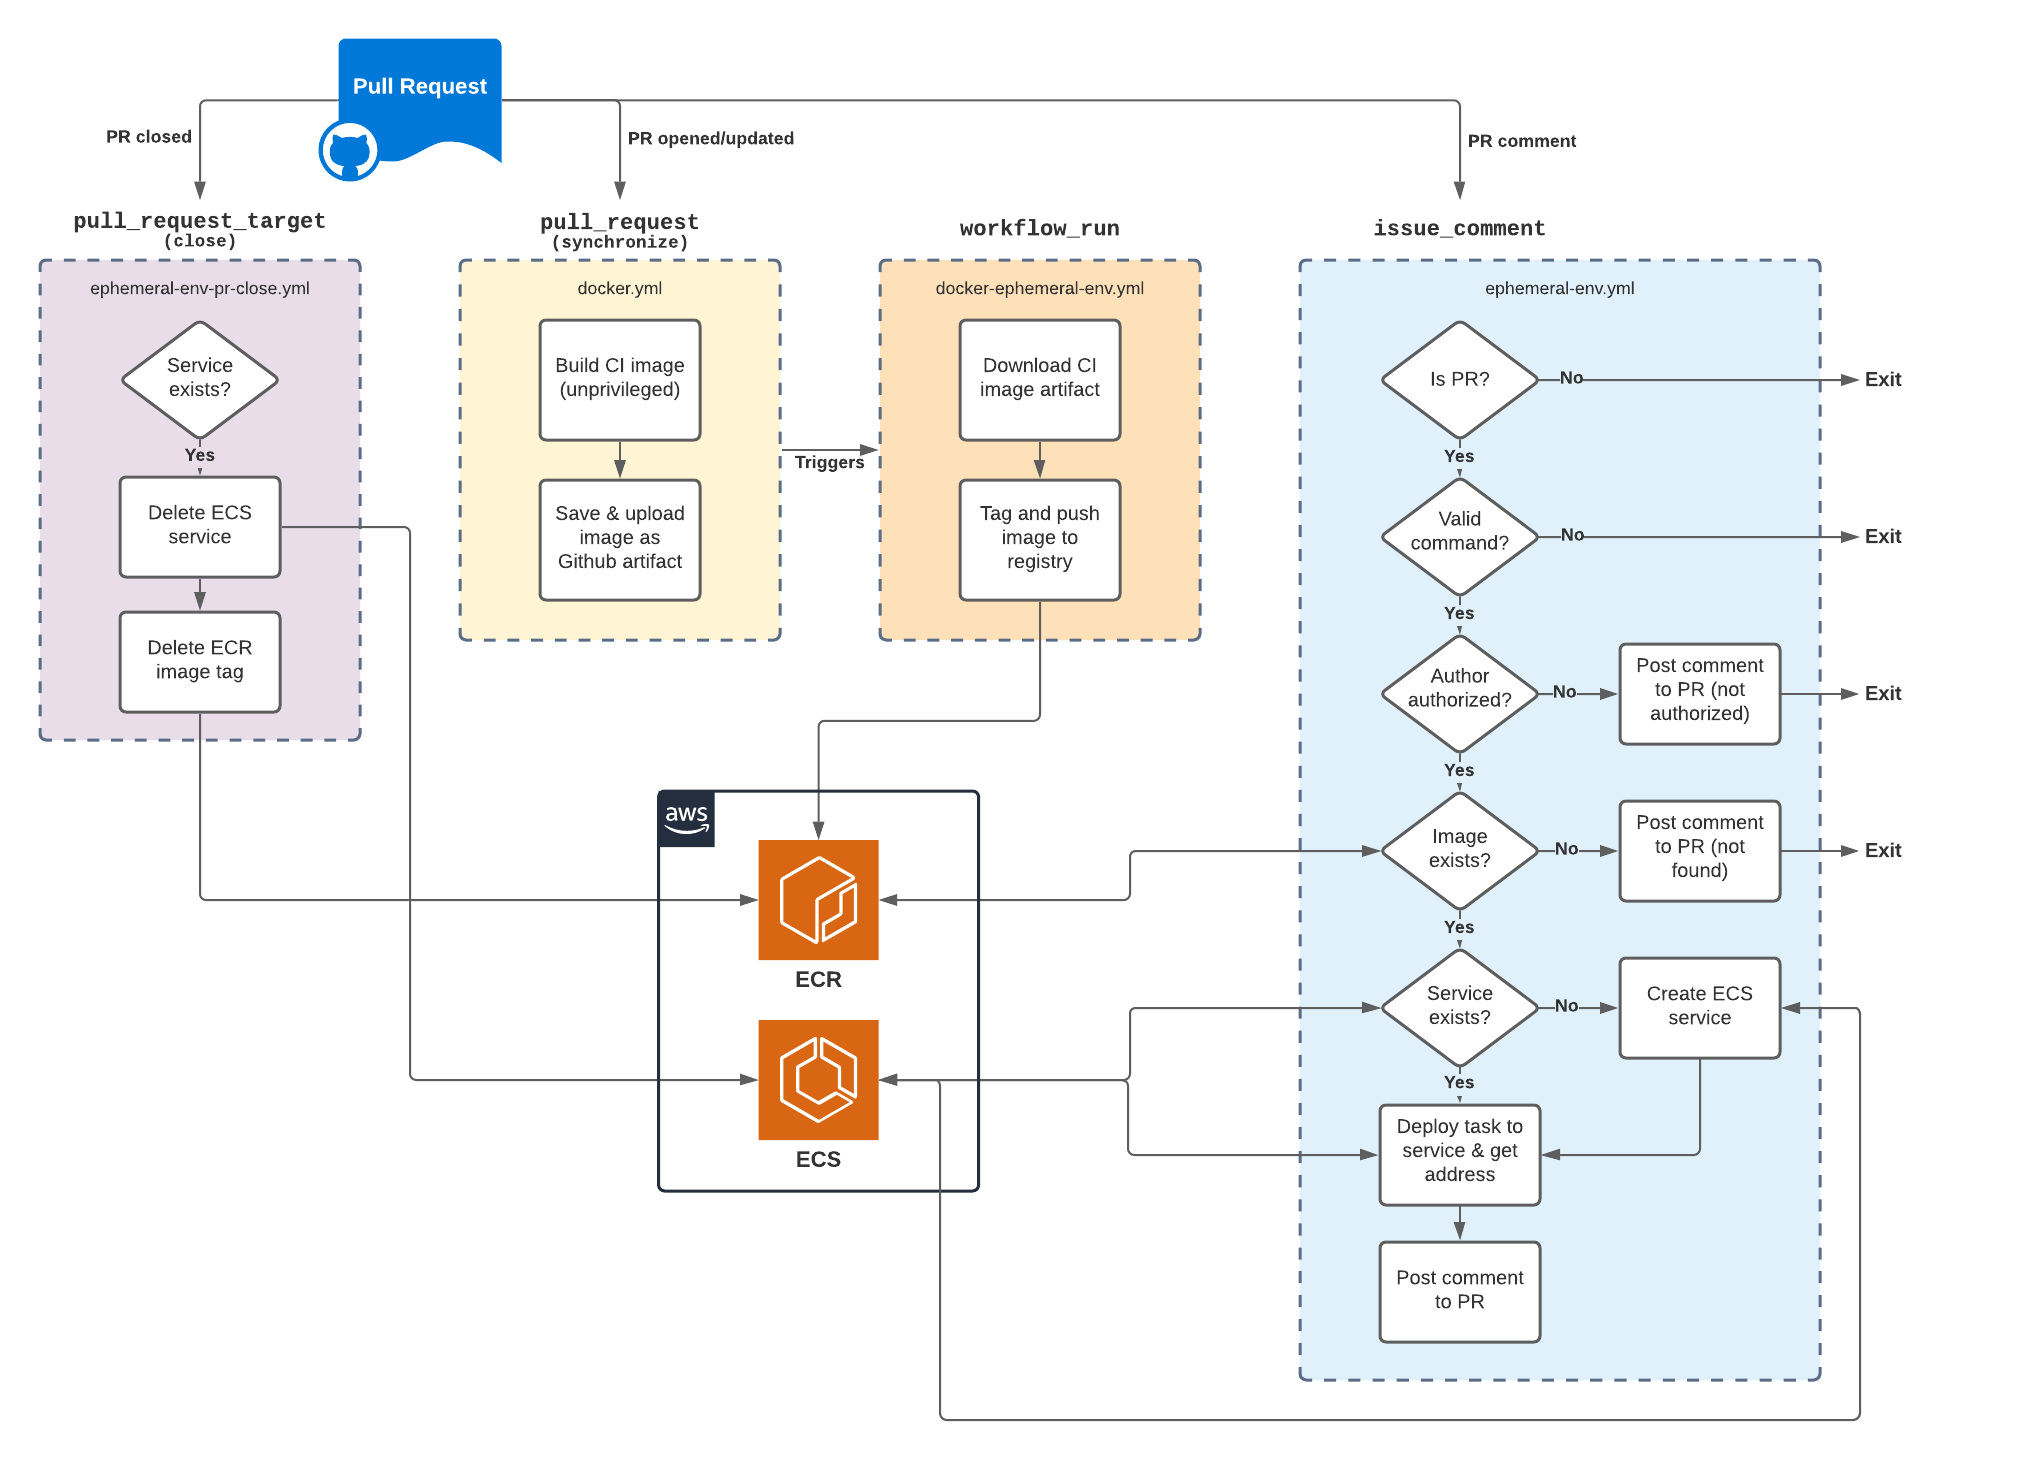
As our current development and CI workflows are tightly integrated with GitHub, we wanted to use GitHub Actions to make the ephemeral test environment integration as seamless as possible. Actions provides many event triggers for which workflows can be configured. Due to the security implications and different levels of access to repository secrets these events provide, the solution required a multi-stage build and provision process.
For example, the pull_request event is where we build our Docker images, but we can't upload these images to a container registry in the same workflow because PRs from forked repositories don't have access to repository secrets (where we're storing account credentials). On the other hand, the pull_request_target event does provide access to secrets, but this increased level of access means that we don't want to execute arbitrary code from unknown sources. So, we've ended up with a mix of actions running jobs that are appropriate to their level of access, using artifacts to pass outputs from one workflow to another.
Container runtime
We're already building Docker images in our CI workflow, so where can we run these things? We evaluated a few container runtime solutions including Heroku and Google Cloud Run, but found that AWS Fargate provided a good balance of cost and functionality. In short, Fargate allows us to spin up a new publicly-available service in ECS (they also support EKS for Kubernetes-based workflows) using a container image we push to a private registry in ECR. We'll walk through how to setup the various AWS services below.
Obviously it's possible to configure the services below using Terraform, but that's currently out of scope for this effort. We'll be happy to share configuration as code in future iterations.
Elastic Container Registry
First, we create our private container registry in ECR. While it's possible to use Docker Hub or another registry service, we didn't want to push images for each PR into the public Superset registry.
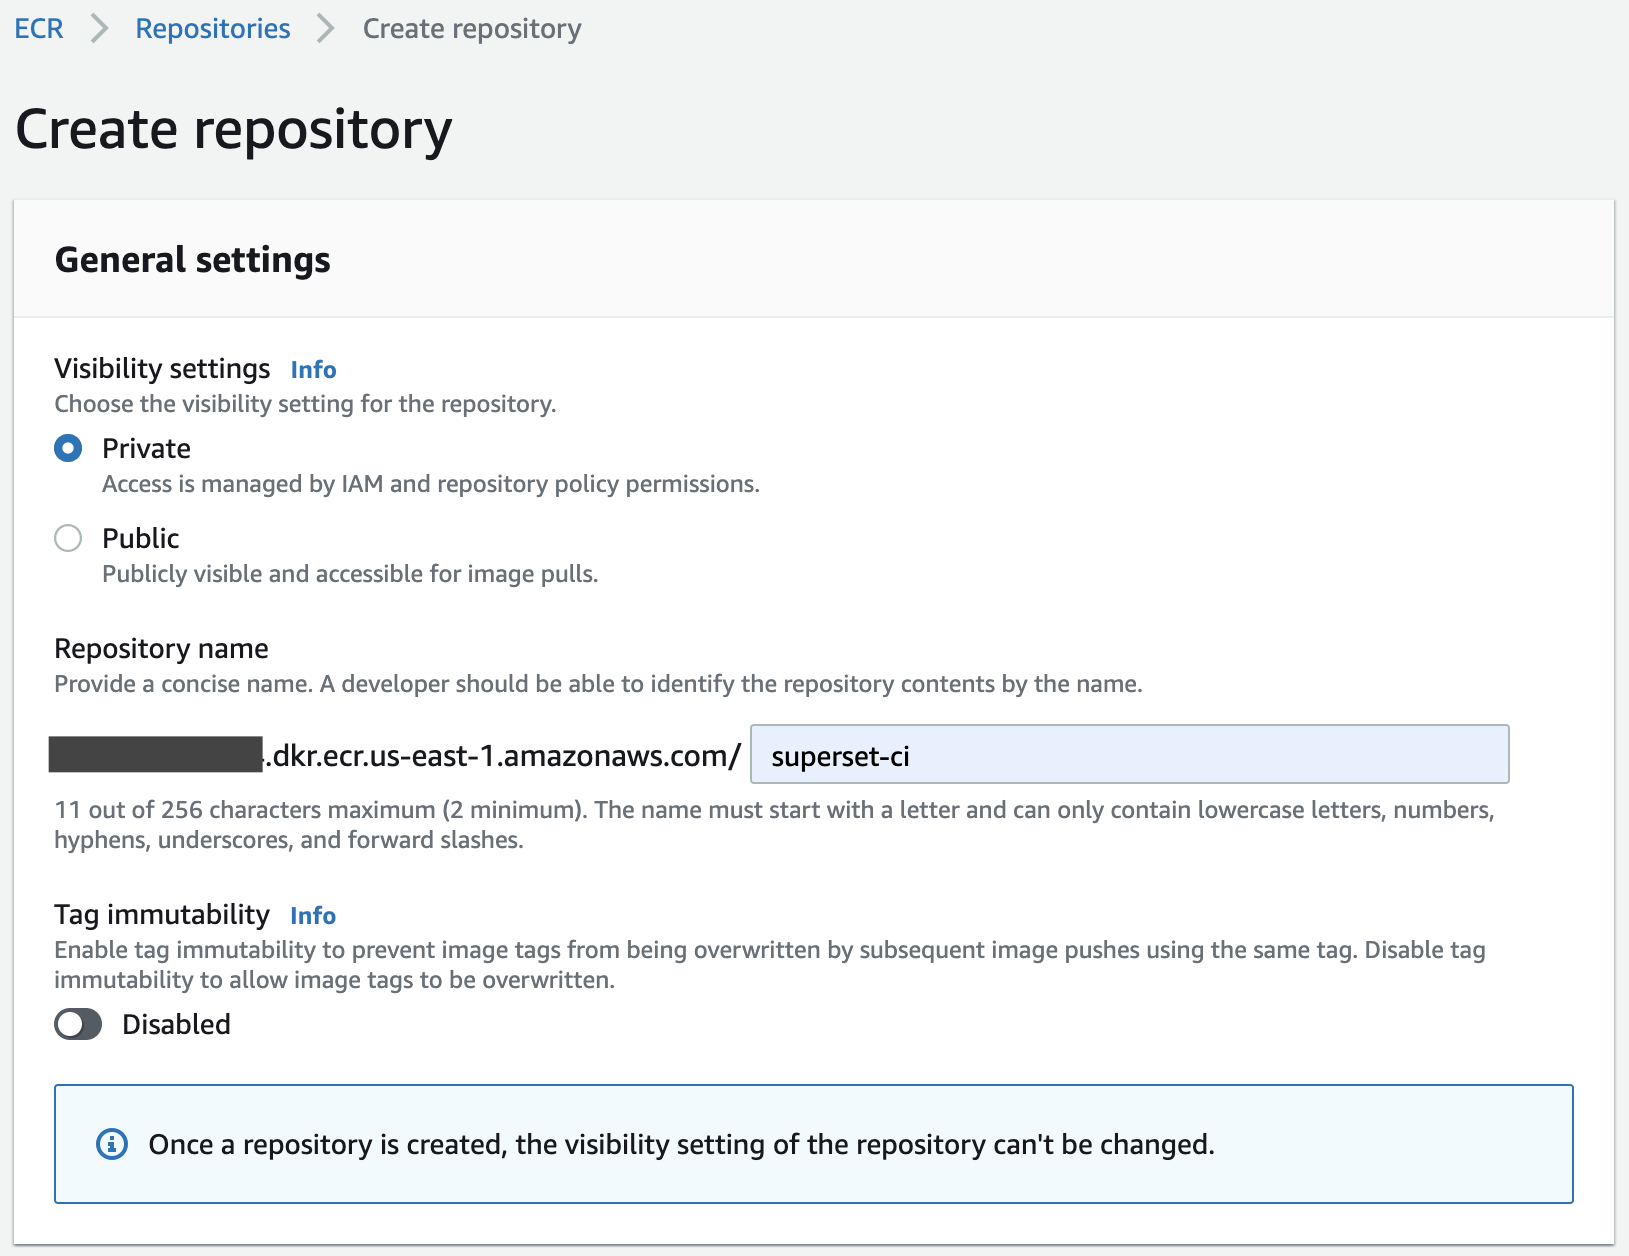
As our pull_request event-based workflows do not have access to repository secrets when opened from forked repos, we use a separate workflow_run event that is triggered upon completion of the pull_request workflow where our images are built. This privileged workflow fetches the built image that's been stashed as a workflow artifact, tags it with the PR number and pushes it to our private ECR registry.
Elastic Container Service
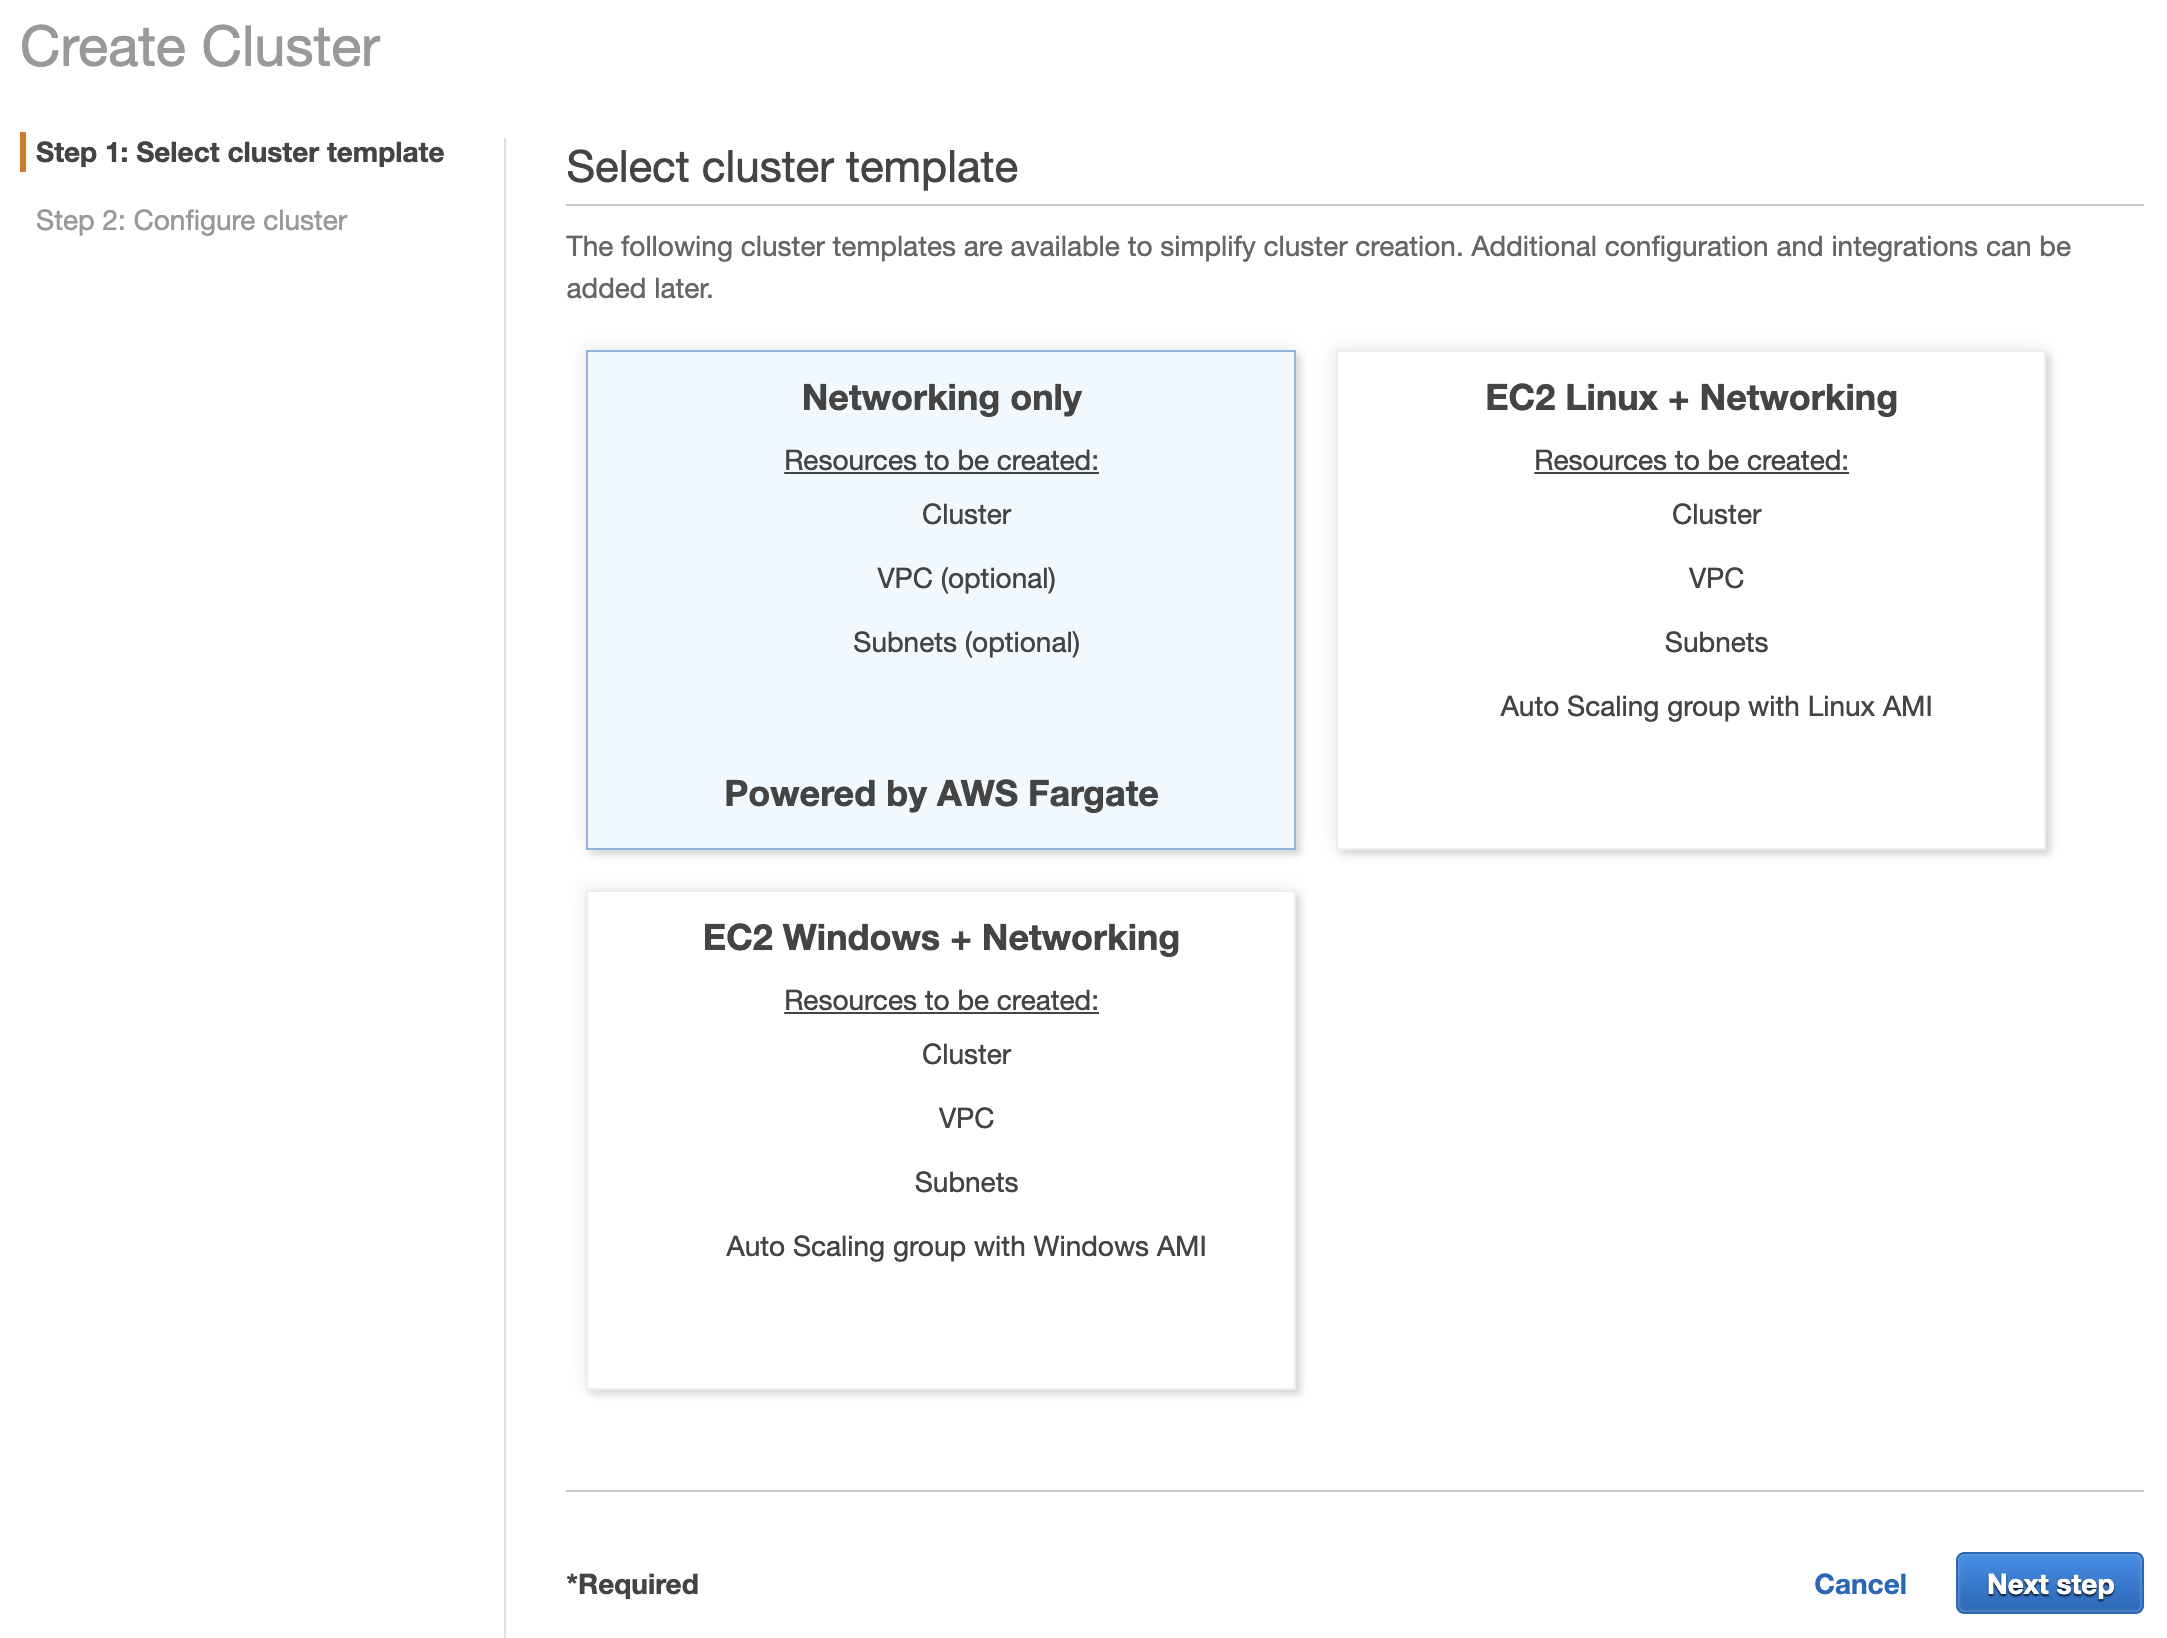
Next, we'll create a new cluster in ECS. For Fargate use, we'll go with the "Networking only" template.
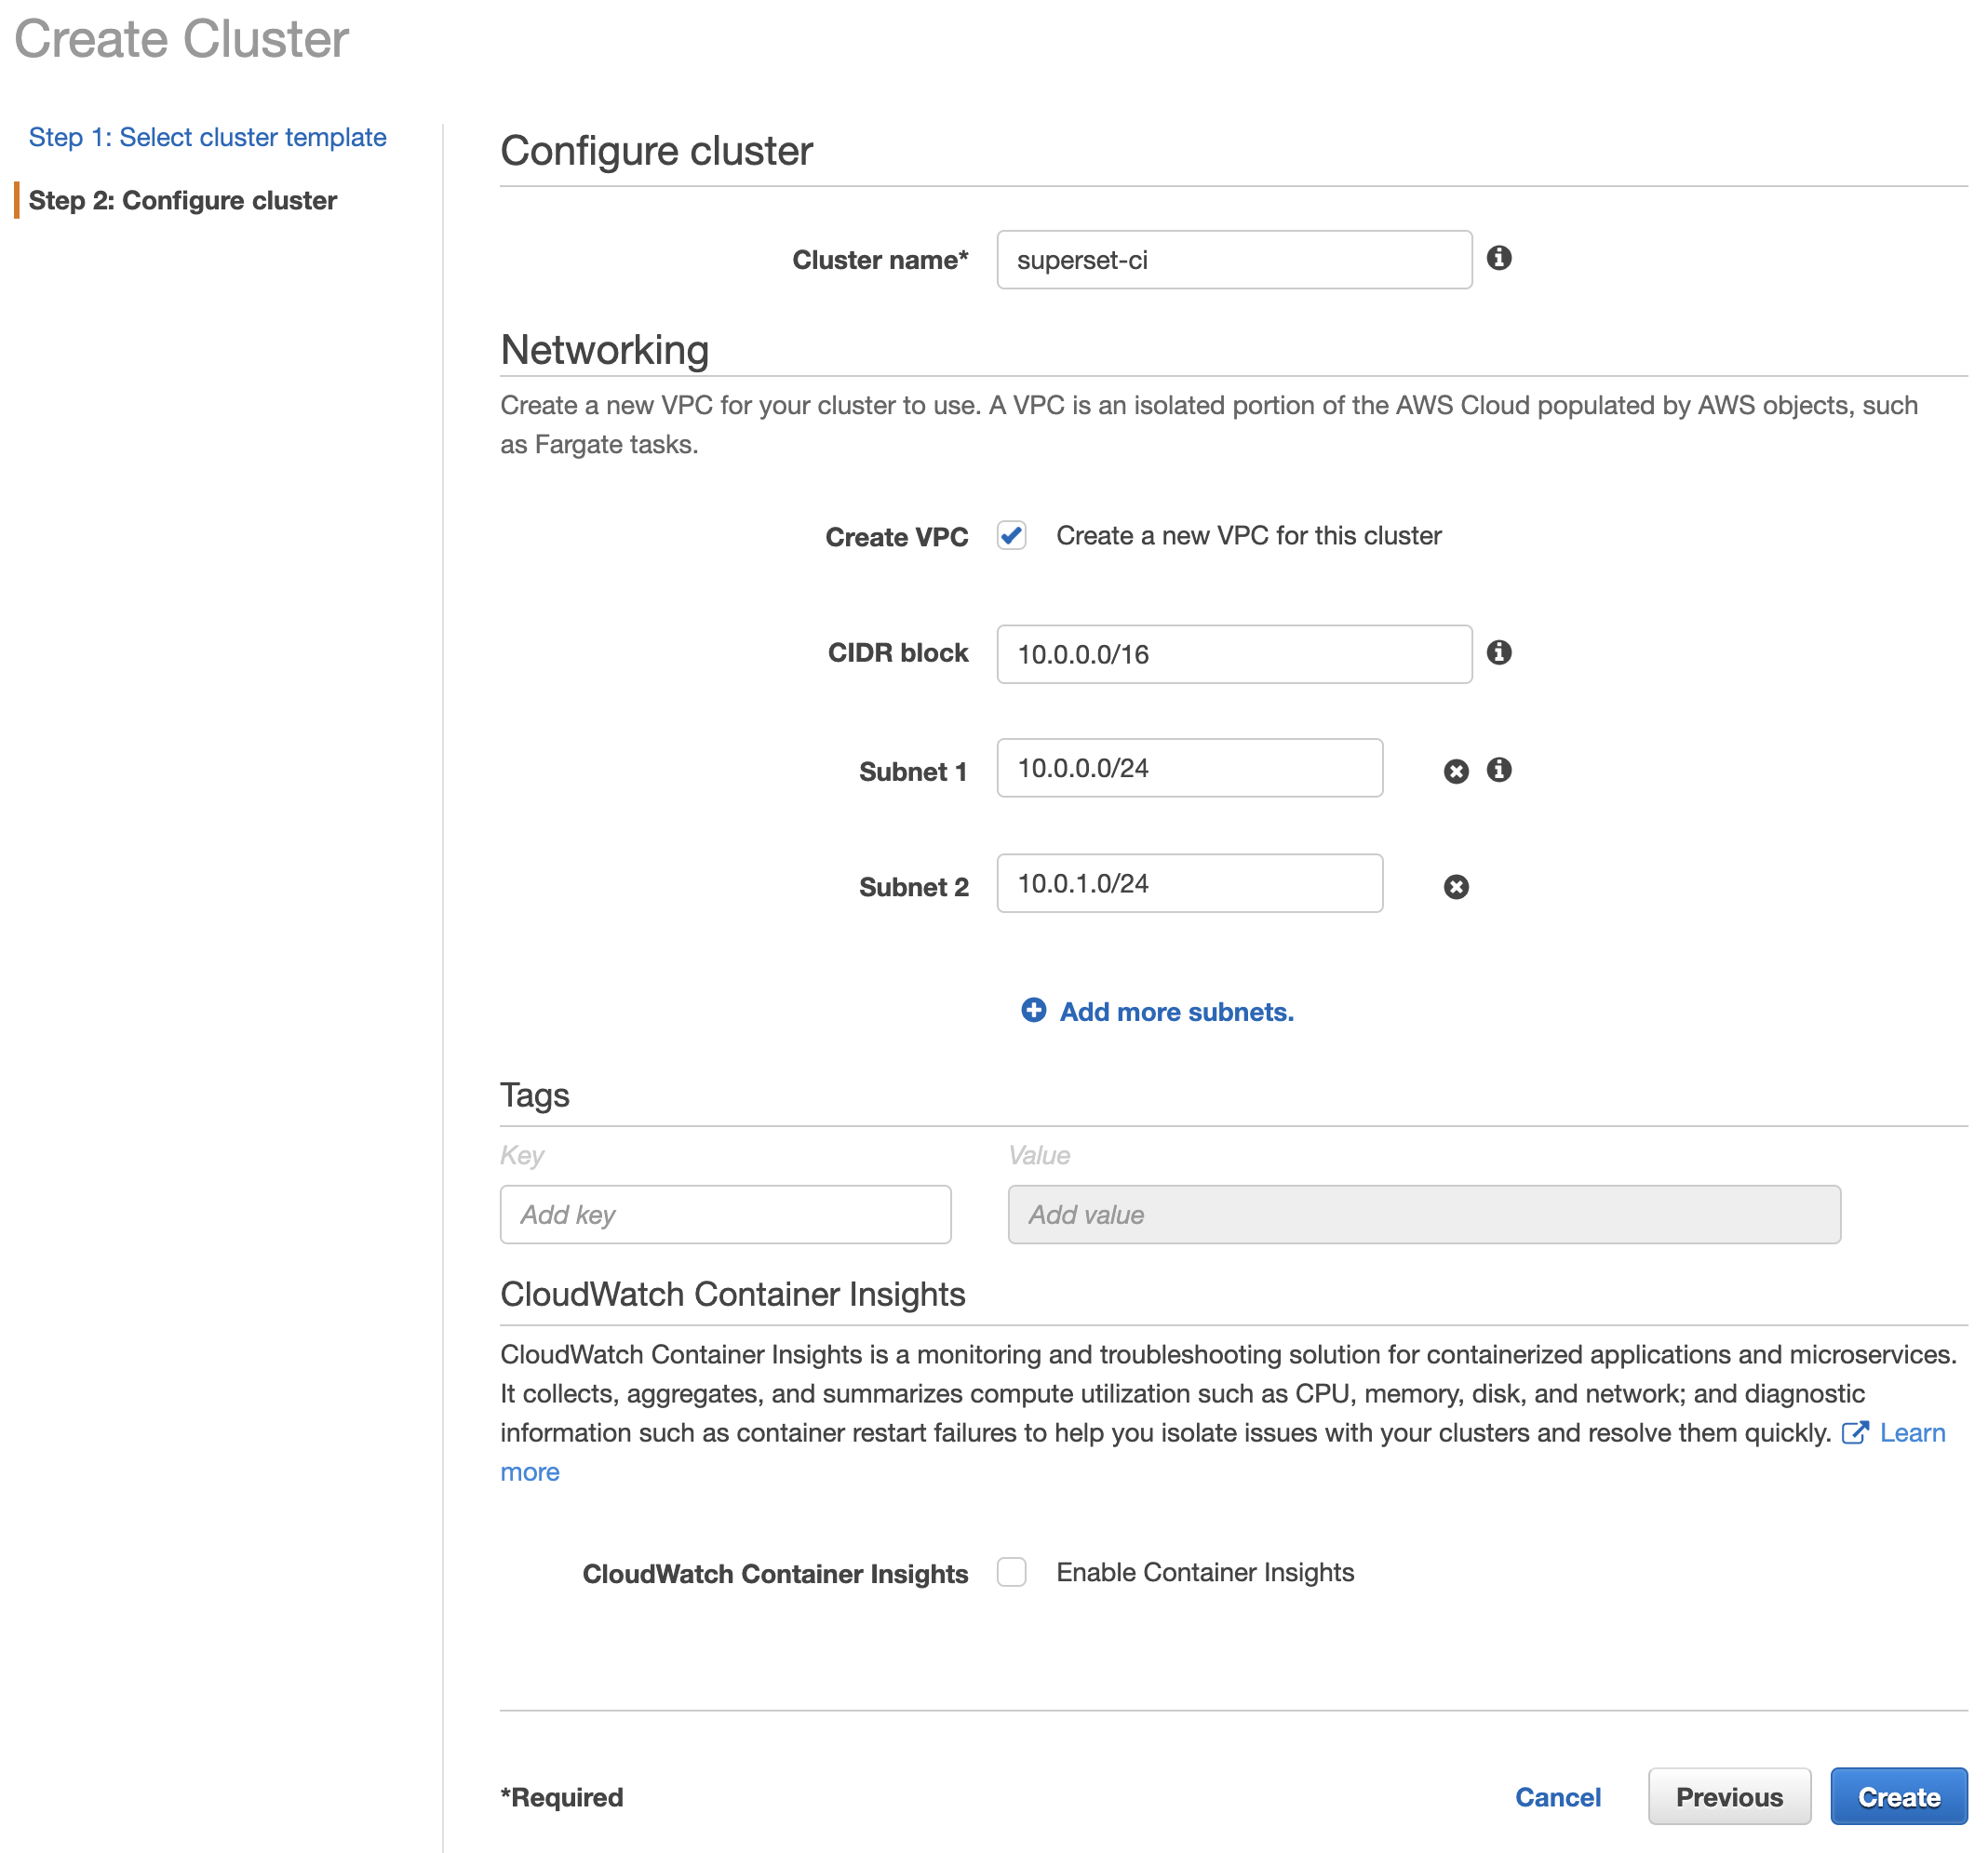
You have the option to create a new VPC and configure the networking options in the following screen. An internet gateway will be automatically created and attached to the subnets when the cluster is created, giving your cluster access to the public internet.
One last step to allow public connections to your Fargate containers is to configure a security group allowing inbound access to the port you're running your application on (8080 in our case), and permissive outbound rules to fetch container images, etc.


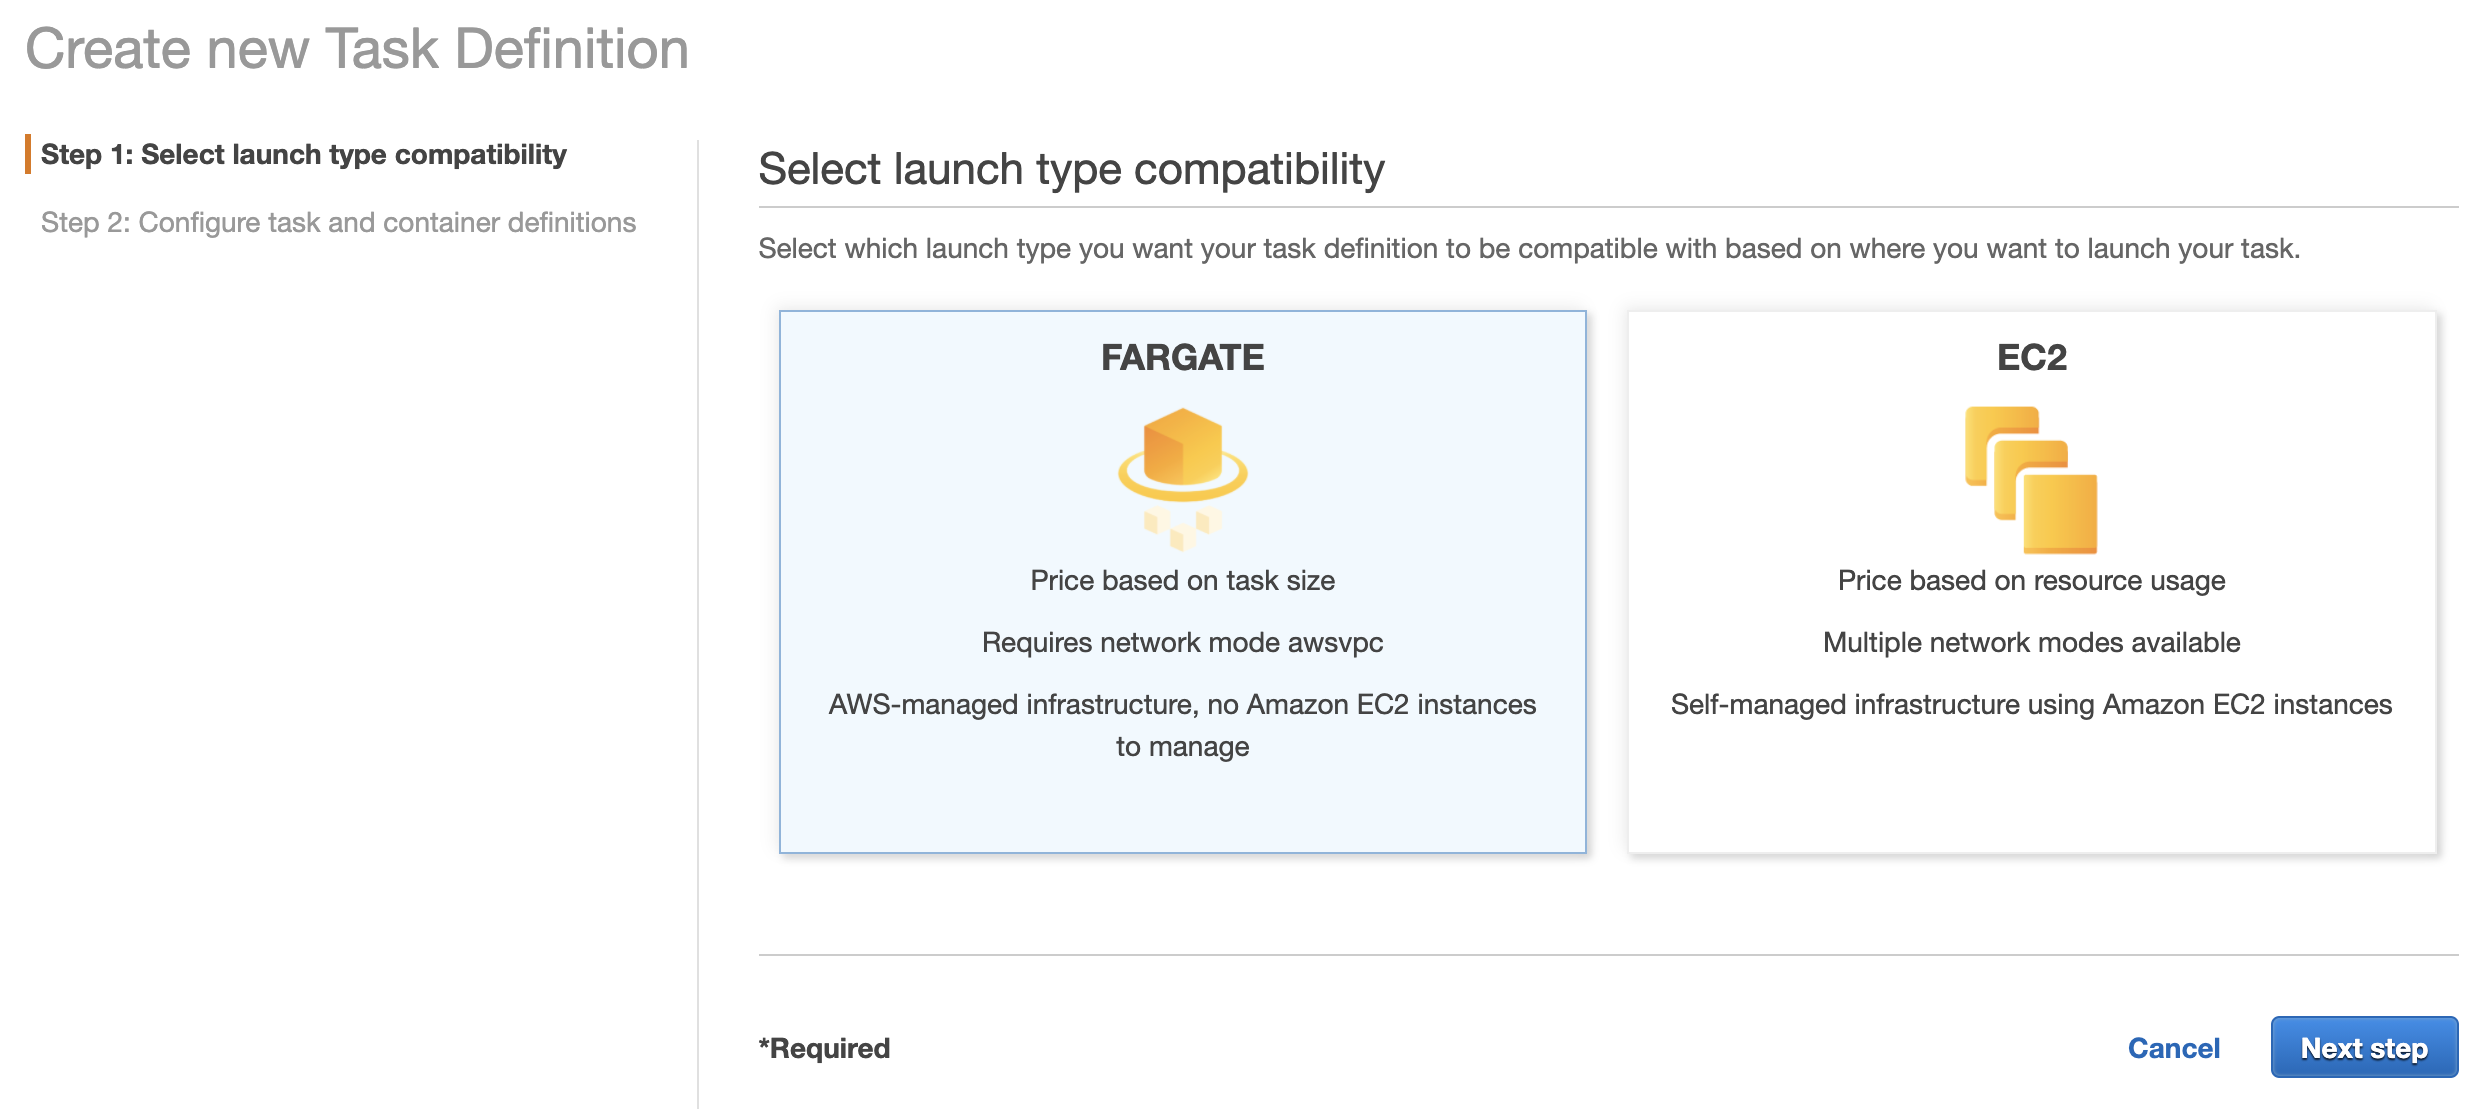
Once your cluster has been created, we need to create a default task definition to serve as the template for our task deployment workflow. Choose the Fargate launch type.
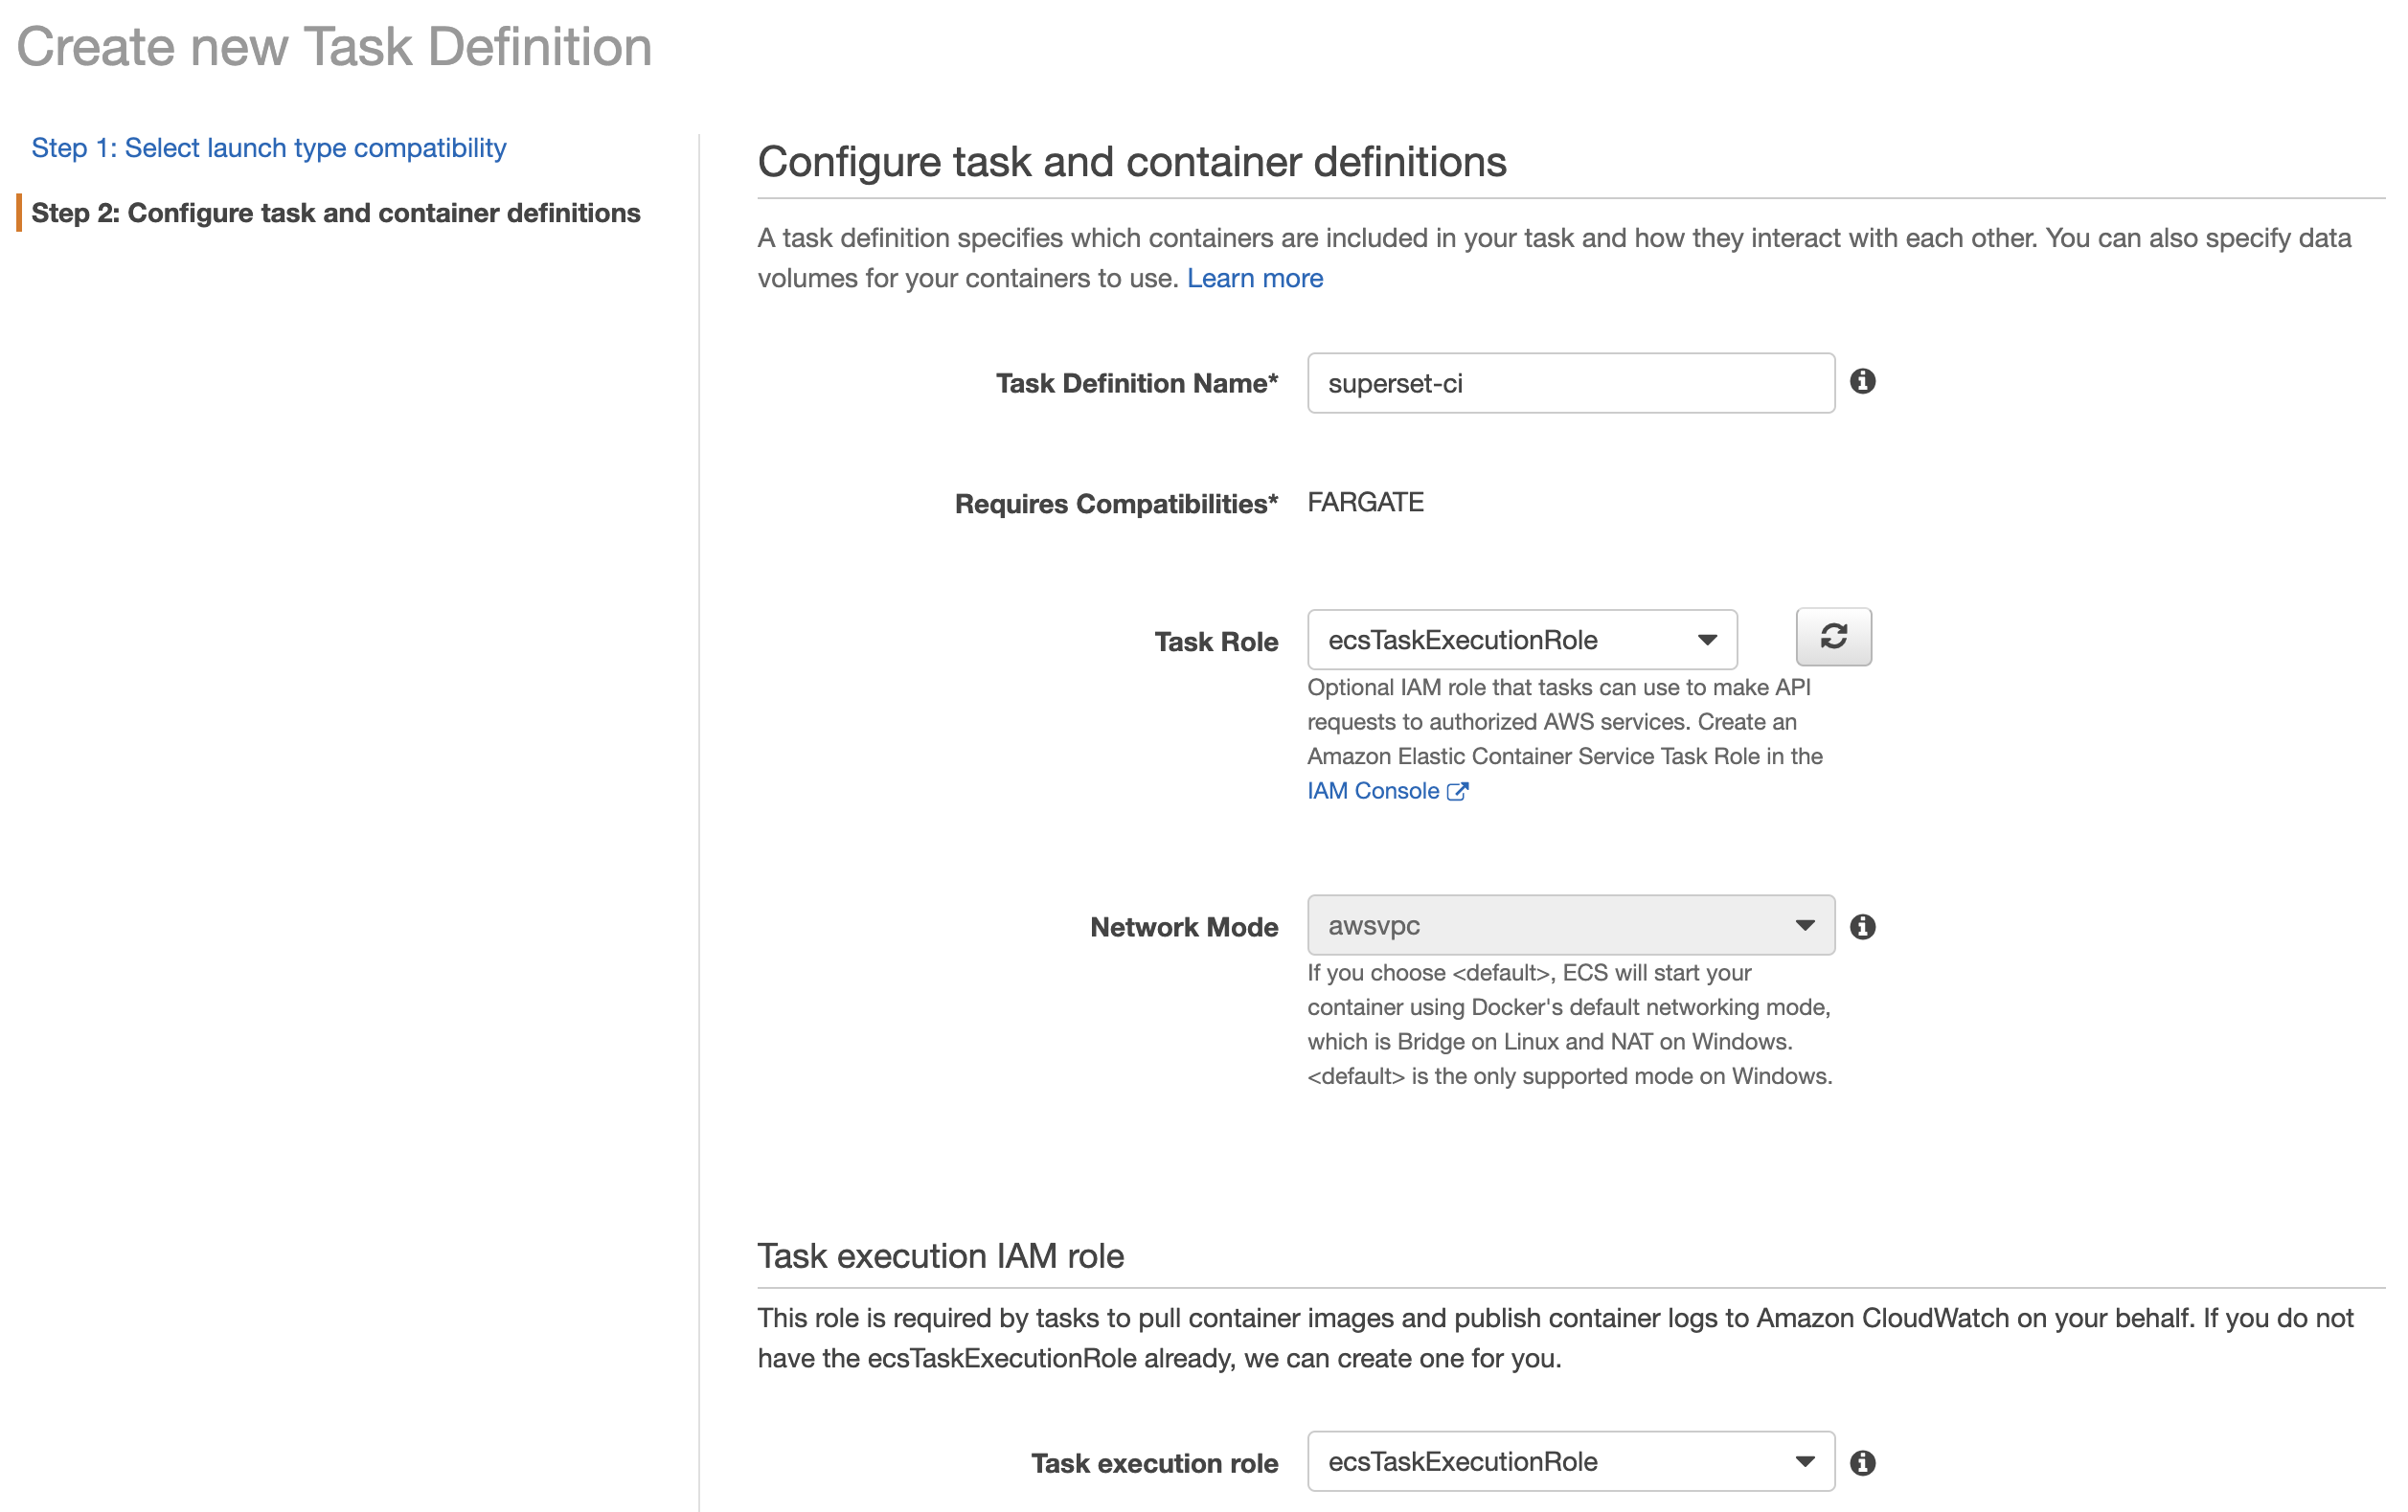
Give your task definition a name (this will be used in your GitHub Actions workflows) and assign the Task Role and Task execution role to ecsTaskExecutionRole (this role was created automatically when creating the ECS cluster).
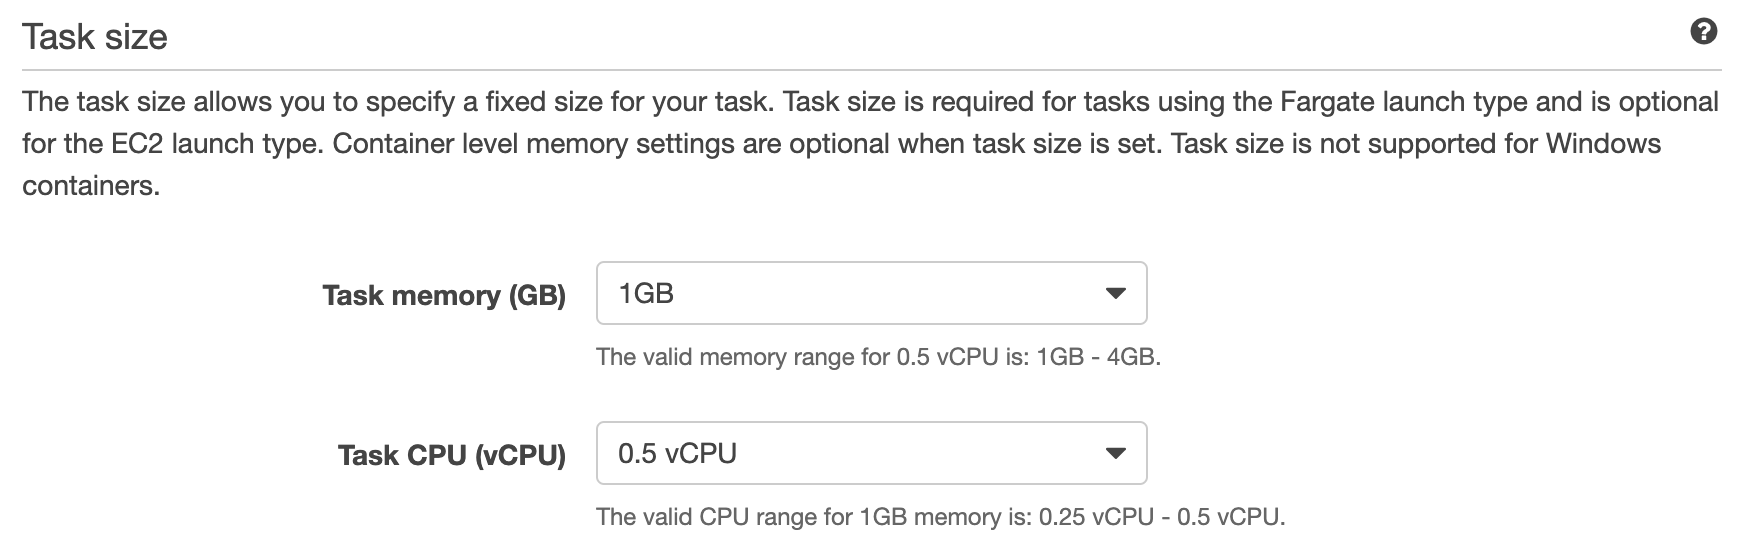
Assign the desired memory and CPU allocations for the task. Fargate pricing is based on resource usage, so allocate only the amount required for your application to run.
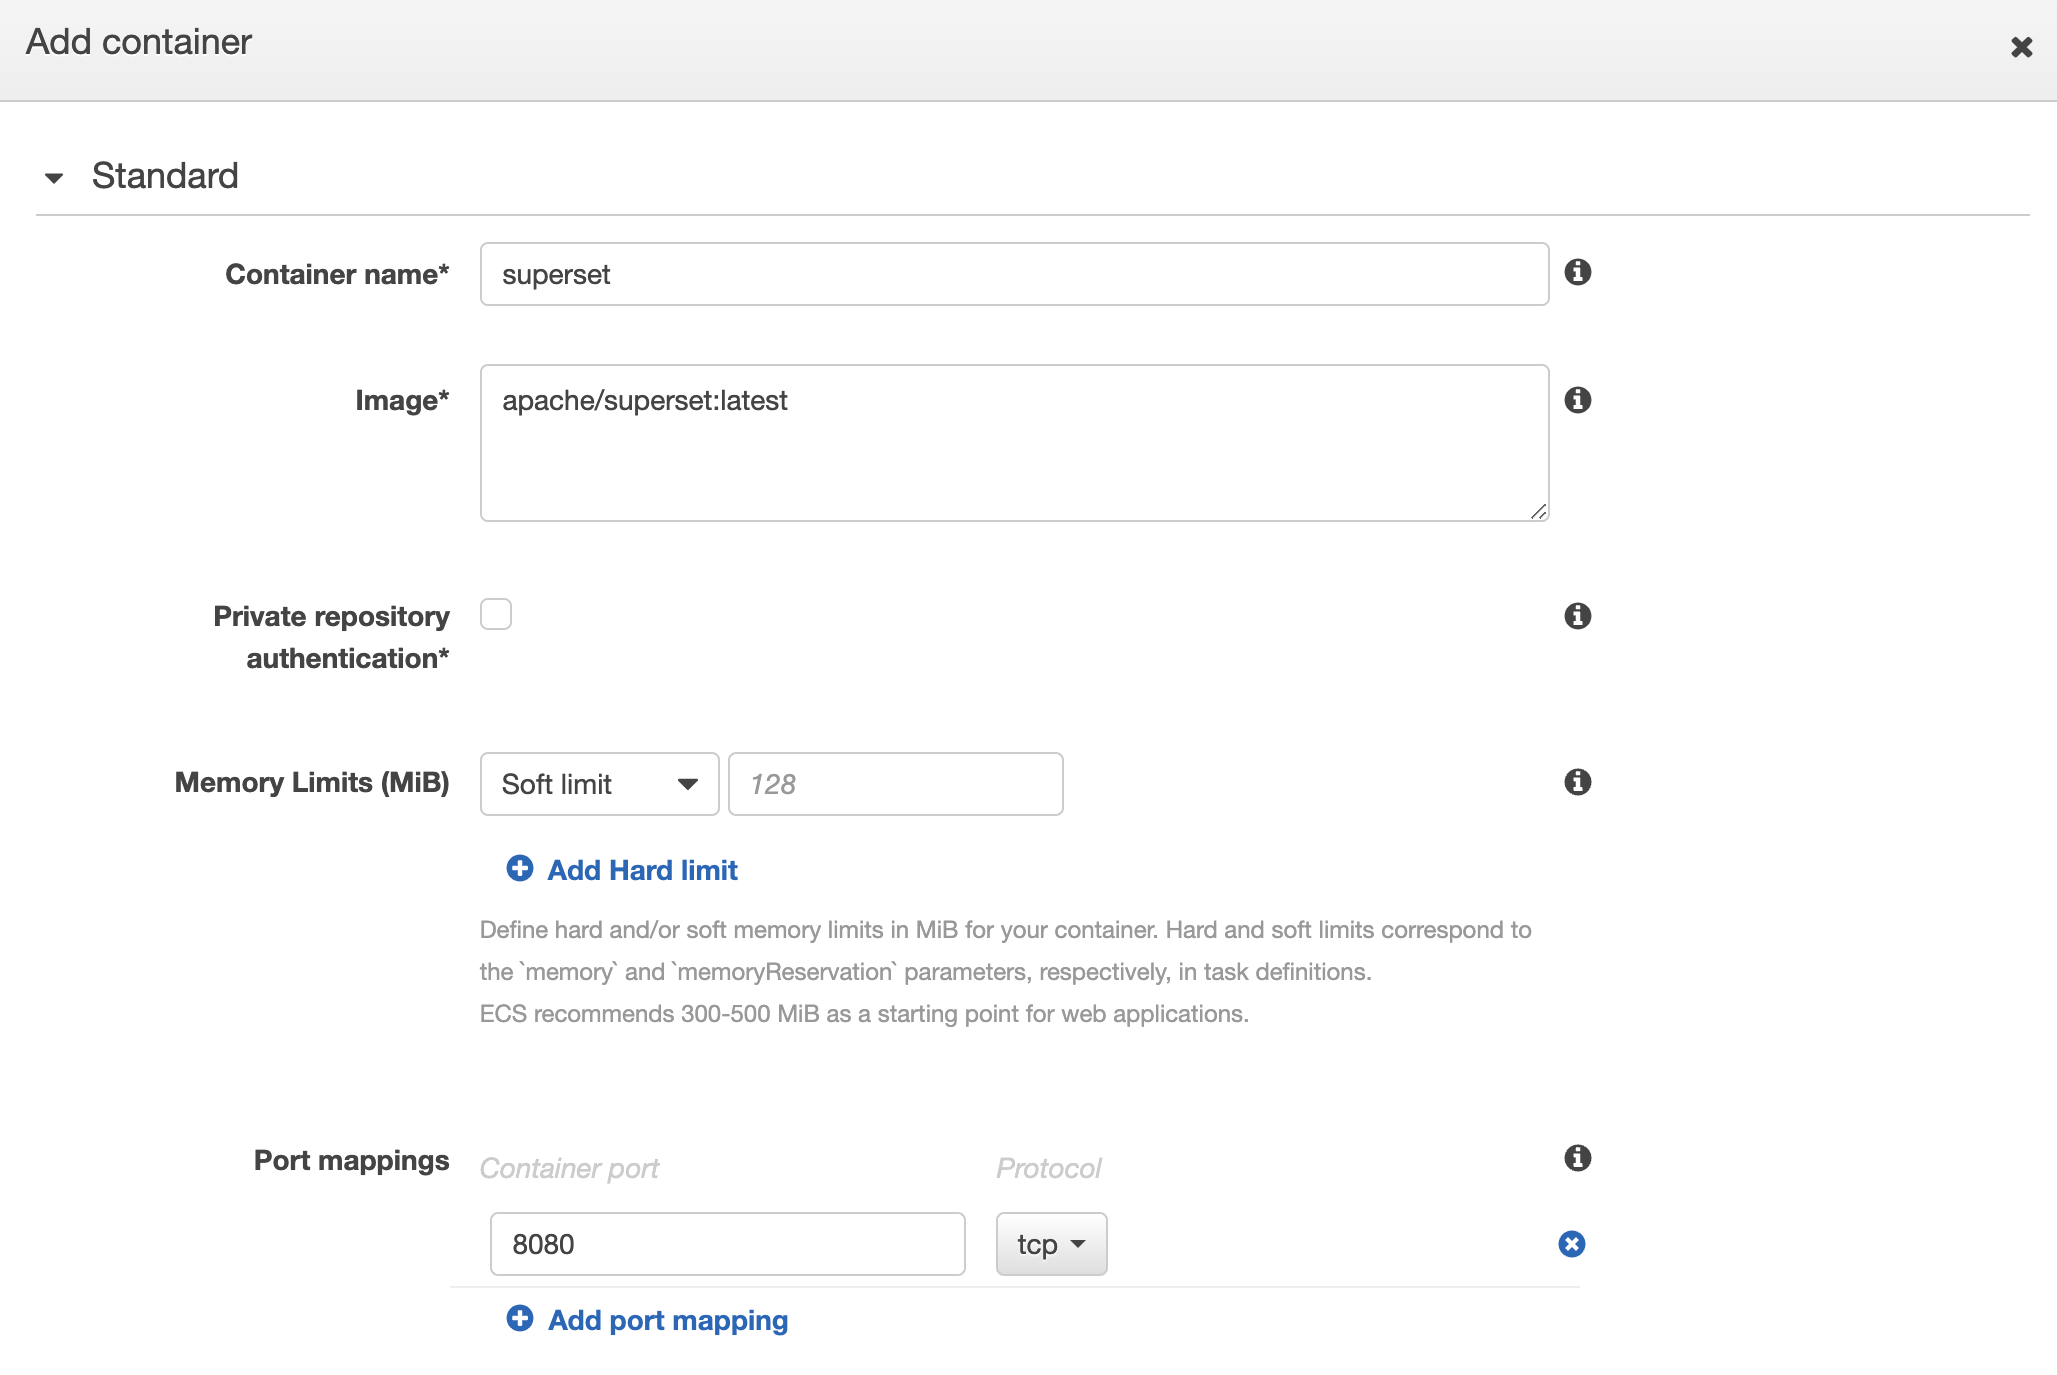
Next, add a default container to your task definition. The Image value will be overridden in each task launched from the CI workflow, so here we use a default value of the public Superset image:tag from Docker Hub. Note that the Private repository authentication option should remain unchecked for use with our private ECR registry.
IAM
Now that we have our container registry and ECS resources configured, we need to create a user for our CI workflow to interact with these services. Navigate to IAM and create a new user with an inline policy matching the following:
{
    "Version": "2012-10-17",
    "Statement": [
        {
            "Sid": "",
            "Effect": "Allow",
            "Action": [
                "iam:PassRole",
                "ecs:UpdateTaskSet",
                "ecs:UpdateService",
                "ecs:UpdateContainerInstancesState",
                "ecs:UntagResource",
                "ecs:TagResource",
                "ecs:StopTask",
                "ecs:StartTelemetrySession",
                "ecs:StartTask",
                "ecs:RunTask",
                "ecs:RegisterTaskDefinition",
                "ecs:RegisterContainerInstance",
                "ecs:PutAttributes",
                "ecs:Poll",
                "ecs:ListTasks",
                "ecs:ListTaskDefinitions",
                "ecs:ListTaskDefinitionFamilies",
                "ecs:ListTagsForResource",
                "ecs:ListServices",
                "ecs:ListContainerInstances",
                "ecs:ListClusters",
                "ecs:ListAttributes",
                "ecs:DiscoverPollEndpoint",
                "ecs:DescribeTasks",
                "ecs:DescribeTaskSets",
                "ecs:DescribeTaskDefinition",
                "ecs:DescribeServices",
                "ecs:DescribeContainerInstances",
                "ecs:DescribeClusters",
                "ecs:DeregisterTaskDefinition",
                "ecs:DeregisterContainerInstance",
                "ecs:DeleteTaskSet",
                "ecs:DeleteService",
                "ecs:CreateTaskSet",
                "ecs:CreateService",
                "ecr:UploadLayerPart",
                "ecr:UntagResource",
                "ecr:TagResource",
                "ecr:PutImage",
                "ecr:ListTagsForResource",
                "ecr:ListImages",
                "ecr:InitiateLayerUpload",
                "ecr:GetRepositoryPolicy",
                "ecr:GetLifecyclePolicyPreview",
                "ecr:GetLifecyclePolicy",
                "ecr:GetDownloadUrlForLayer",
                "ecr:GetAuthorizationToken",
                "ecr:DescribeRepositories",
                "ecr:DescribeImages",
                "ecr:DescribeImageScanFindings",
                "ecr:CompleteLayerUpload",
                "ecr:BatchGetImage",
                "ecr:BatchDeleteImage",
                "ecr:BatchCheckLayerAvailability",
                "ec2:DescribeNetworkInterfaces"
            ],
            "Resource": "*"
        }
    ]
}
GitHub workflows
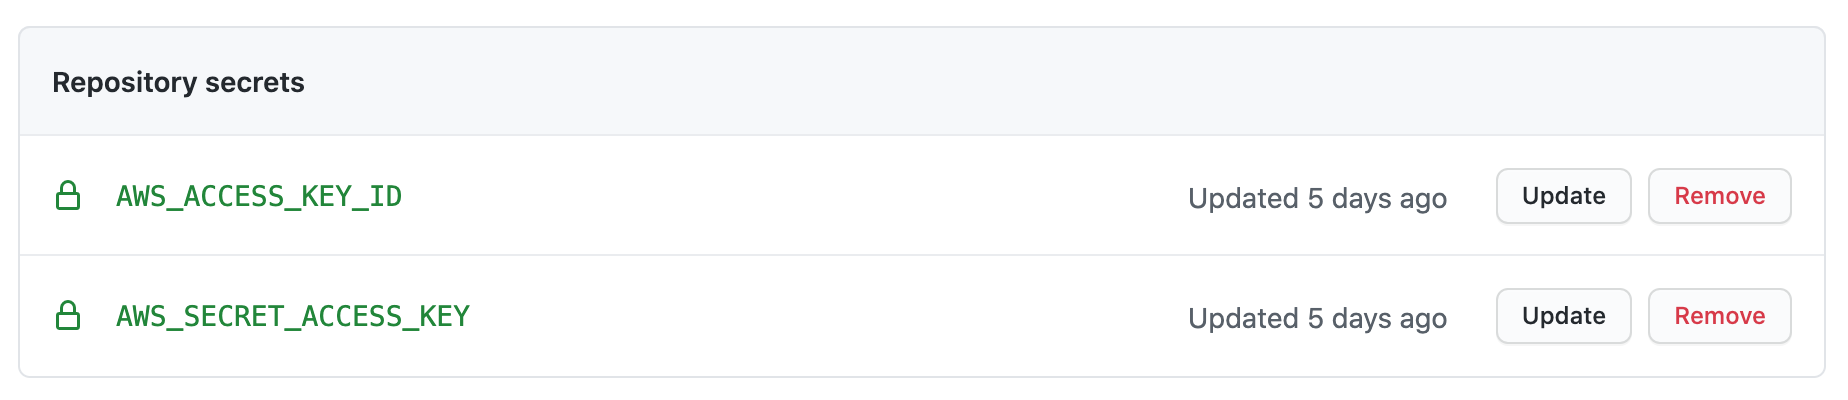
Now we're ready to setup our workflows in GitHub Actions. First thing we'll need to do is store the credentials for the AWS user we just created in the repository secrets. In the GitHub UI, under Settings > Secrets, create the secrets AWS_ACCESS_KEY_ID and AWS_SECRET_ACCESS_KEY.
Let's get started implementing the workflows. Workflow definitions are YAML files that live within your project under .github/workflows. You can find the Superset workflow definitions here.
As mentioned above, we're using several GitHub Actions events to run various phases of our deployment pipeline. We'll describe each of the main actions below.
pull_request
On pull_request events, the Docker image is built, saved as a tarball and uploaded as an artifact for future workflows.
We are using a build target that is specific to our test environment use case, which adds automation around bootstrapping the application. Luckily, the build is able to reuse the cached layers from the standard build, so this step doesn't add much time to our CI pipeline.
workflow_run
The workflow_run event is triggered upon completion of the docker build workflow, allowing us to rehydrate the image artifact and push it to our ECR registry using the AWS credentials stored in the repository secrets.
issue_comment
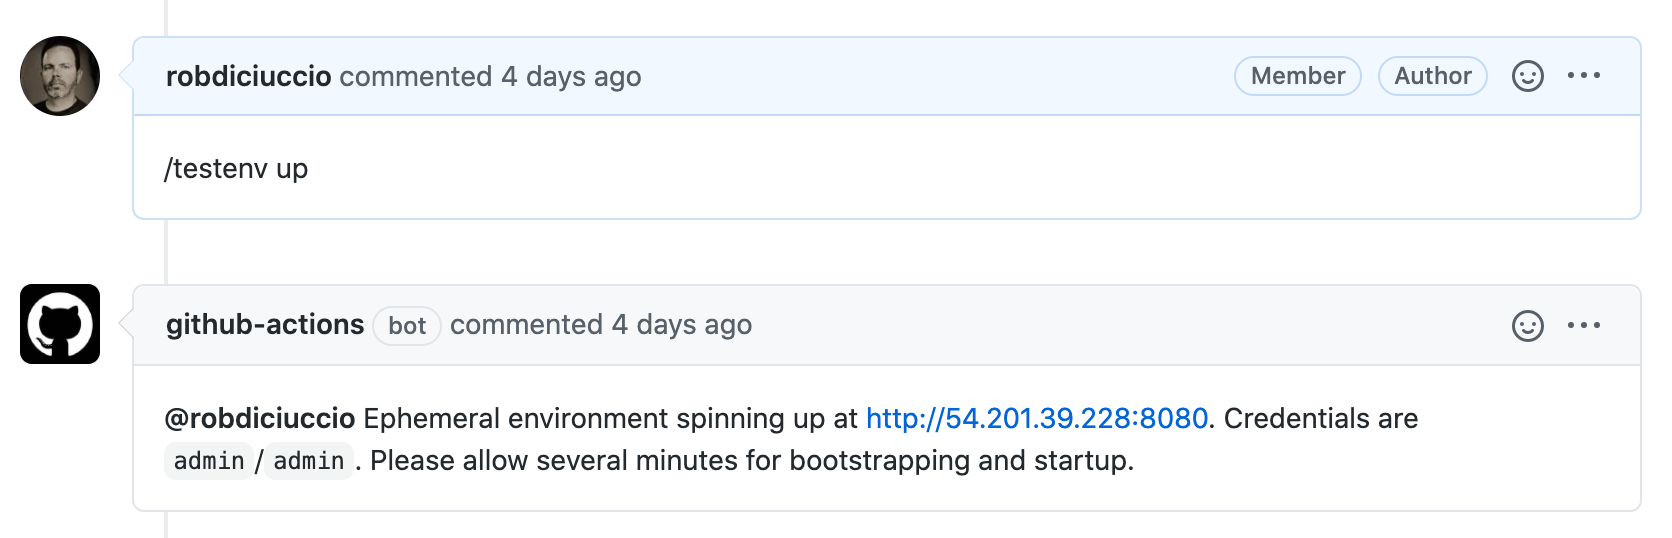
This is where the real magic happens. Test environments are instantiated by creating a comment on a PR containing a slash command /testenv up. In this workflow, we evaluate each comment on PRs to see if it contains the command, and if the comment author is a member of the GitHub organization that owns the repository. For a valid command from an authorized user, we then kickoff the deployment process.
First, the task definition template is updated to include the correct container image for the PR. This template JSON was exported from the ECS task definition we configured earlier. An ECS service (with assignPublicIp=ENABLED) is then created and the custom task definition deployed to the service. Note that the subnets and security group we defined earlier are passed in with the service creation command.
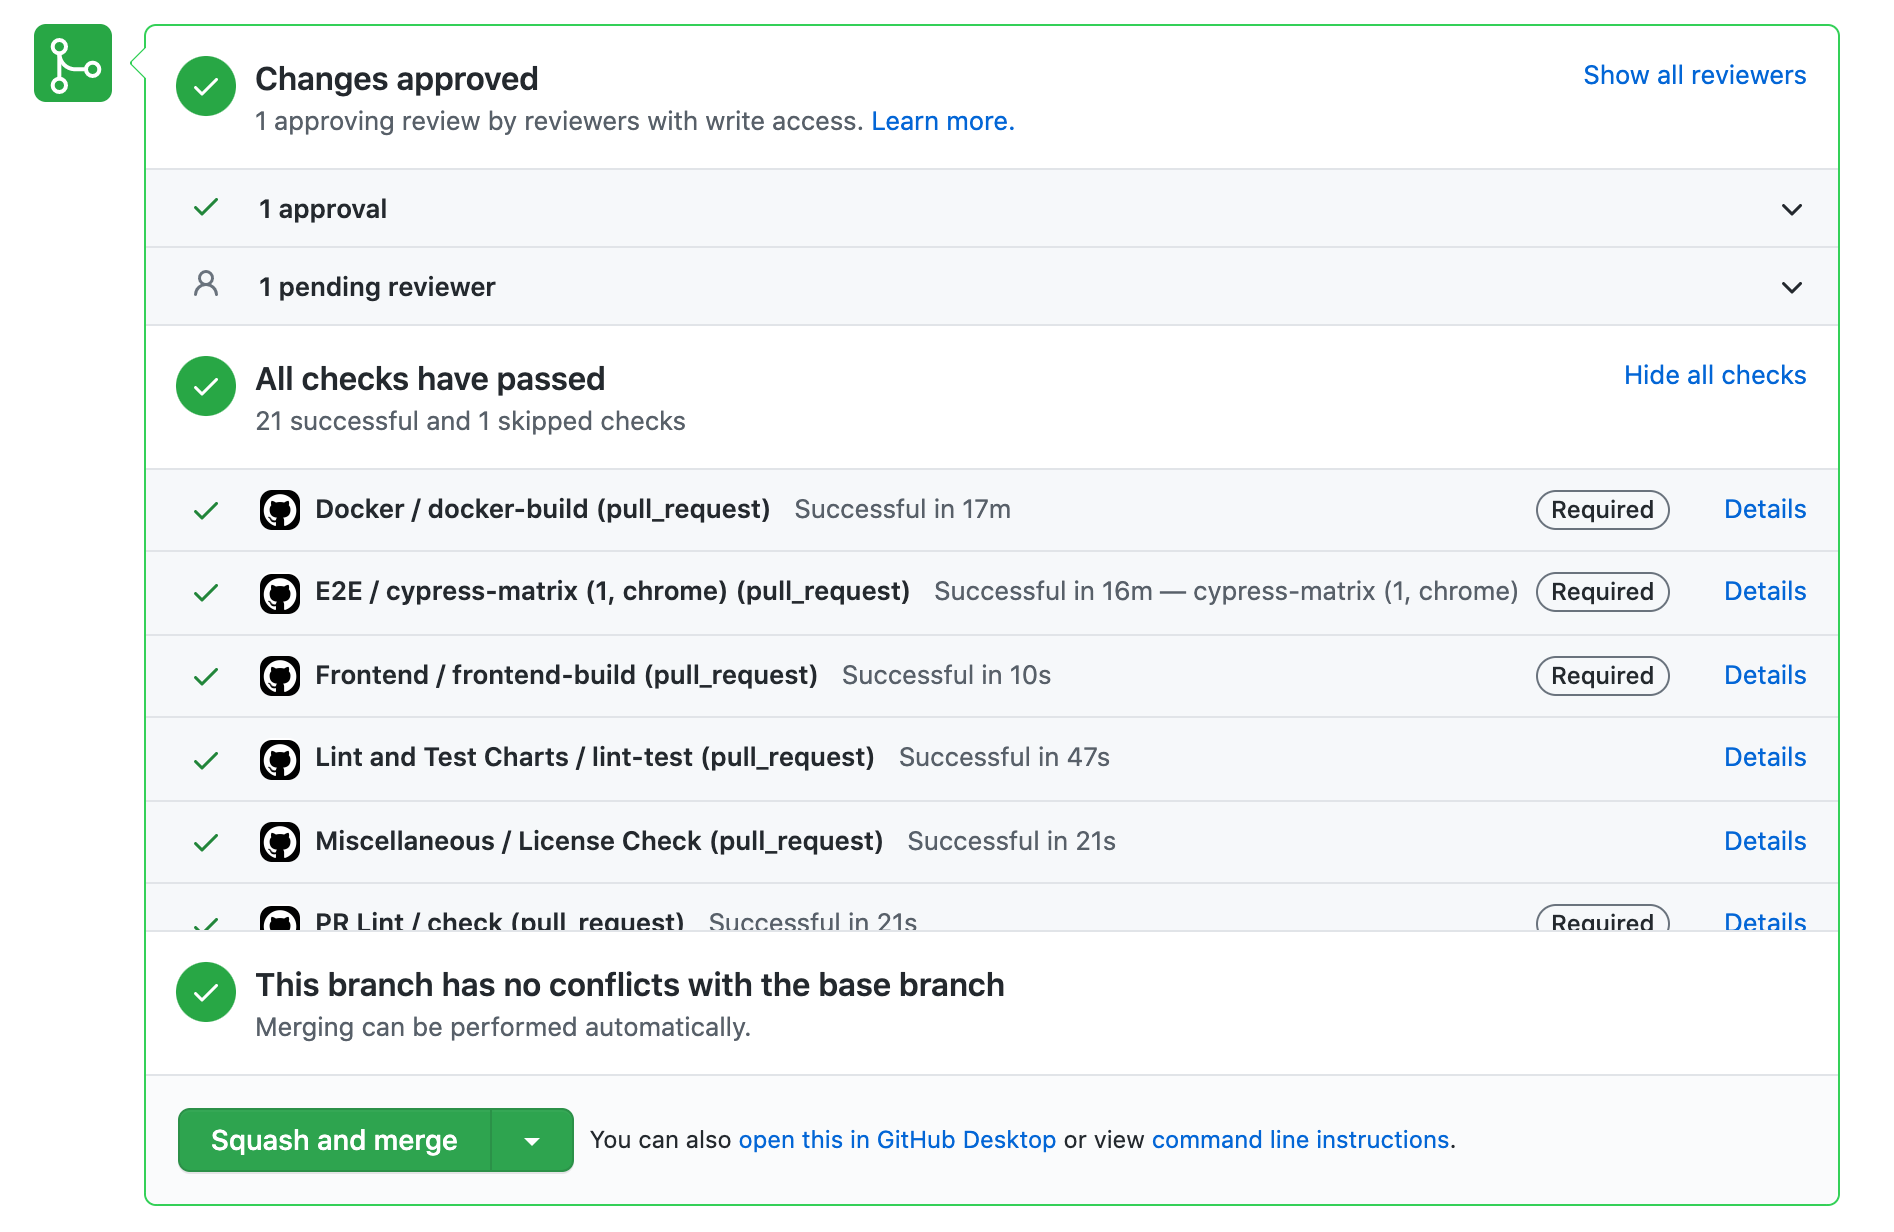
Once the task has successfully been deployed to the service, a number of commands are performed to fetch the public IP address of the running service (AWS could make this easier). A comment is then posted to the PR with the address of the running test environment.
pull_request (close)
When pull requests are closed, running services for the pull request are terminated and tags are removed on container images in the registry.
Conclusion and next steps
We're still early into our journey with GitHub-based ephemeral test environments, but we've already seen a good amount of success with this approach. The community adoption has increased, reducing regressions in the project, and we're taking an iterative approach to improving the functionality.
A few things still on our roadmap:
- Feature flag overrides (done!)
- Application configuration overrides
- Support for asynchronous tasks (Celery)
- Terraforming AWS resources
There's also future work to be done around keeping costs down. While costs are still relatively low, we'll be putting in some guardrails for this in the form of automatically shutting down instances after ~48h, removing unused images from the ECR registry and using spot instances in Fargate.
Preset is currently sponsoring this feature for the Superset community, but we're also planning on taking advantage of the AWS promotional credits program for open source projects.
If you're interested in setting up a similar ephemeral test environment workflow in your open source project, the Superset CI workflows are free to use and adapt to your own use cases.
Mandala image credit: ginnerobot, CC BY-SA 2.0
