


Build a Slack Dashboard (Part 1): Extracting Data Using Meltano


Slack is one of the most popular community tools out there. Even though it was originally conceived as a tool for teams to communicate and coordinate, Slack embraced a free tier that lets community organizers create workspaces with unlimited members and unlimited channels.
This lead to the meteoric rise of thousands of Slack communities across the world. You can find Slack communities for many of your professional interests, personal interests, social causes, and many more. In fact, the website Slofile will even help you discover new Slack communities to join.
Slack and Open Source
Here at Preset, we're the experts of Apache Superset (incubating) and we invest a lot in the Superset Community. The Superset community is spread across many channels, but a lot of discussions and conversations happen in the community Slack.
As an organization focused on enabling insights through data exploration, visualizations, and dashboards, we're always interested in finding productive ways to use data to help us understand the growth of the Superset project and the health of the Superset community.
Wouldn't you love to have a dashboard like this for your community?

In this blog post series, we'll explore how we can use a few different open source tools to build an awesome dashboard for a Slack community:
- Meltano for ELT (or extract-load-transform)
- Postgres for data storage
- Superset for creating views, visualizations, and dashboards
Dbt stands for data build tool and is the key workflow for writing data transformation scripts using SQL. We'll focus on Singer taps and targets in this blog post.

Meltano = Singer + dbt
Meltano is an open source ELT platform for data integration that facilitates:
- the extraction of data from 3rd party SaaS services
- the loading of data into data stores
- the transformation of the data
Under the hood, Meltano elegantly combines two open source projects -- Singer and dbt.
Singer is open source and the community has created hundreds of data extractors, called Singer taps, to easily pull out data from 3rd party SaaS tools like Gitlab, Google Analytics, Hubspot, and Slack. Using Singer targets, Meltano can load data to destinations like Google BigQuery, Google Sheets, PostgreSQL, and Amazon S3.
Meltano packages both of these tools into a single platform and provides a command line interface and a graphical user interface to interact with everything very easily.
Once you have everything setup, you only need to run a single command to sync your data incrementally from your community Slack into a Postgres database:
meltano elt tap-slack target-postgres --job_id=daily_updateBut we're getting ahead of ourselves 😃
Slack API Access
Slack provides an API that's accessible even for workspaces on the free tier (albeit with more limitations). Unfortunately, it's not as simple as getting access to the API. You actually have to create a Slack app, set up permissions, and add the app to the channels you want to extract data out of.
In the following steps, we'll walkthrough how to get the access you need.
-
If you're not a Workspace Admin, I recommend getting permission from a Workspace Owner first for this project. Then, ask them to elevate your permissions to the Admin level.
-
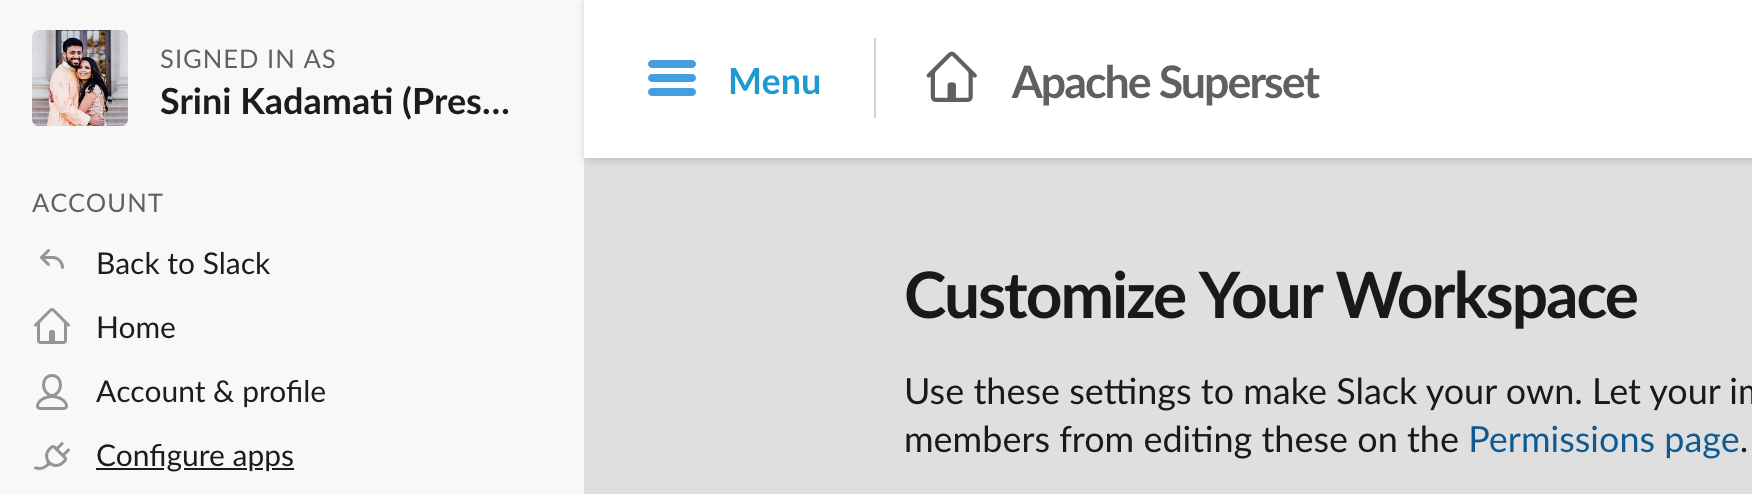
Open the Slack workspace and navigate to [Workspace name] > Setting & administration > Customize [Workspace name].

- In the new browser page that opens, navigate to Menu > Configure apps.
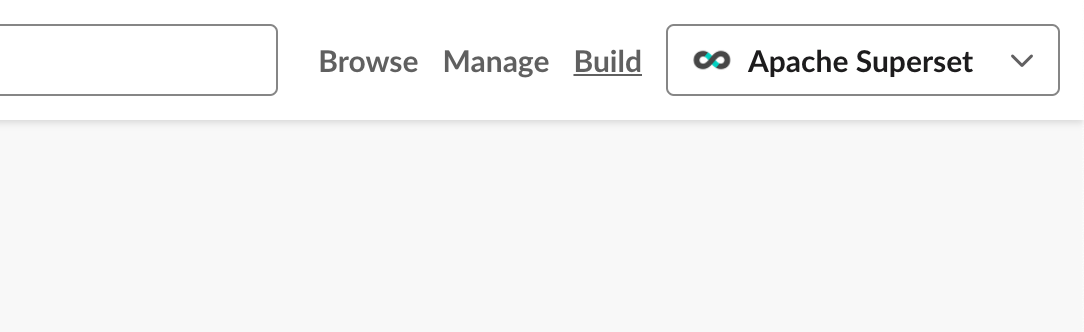
- Select Build in the top right corner.
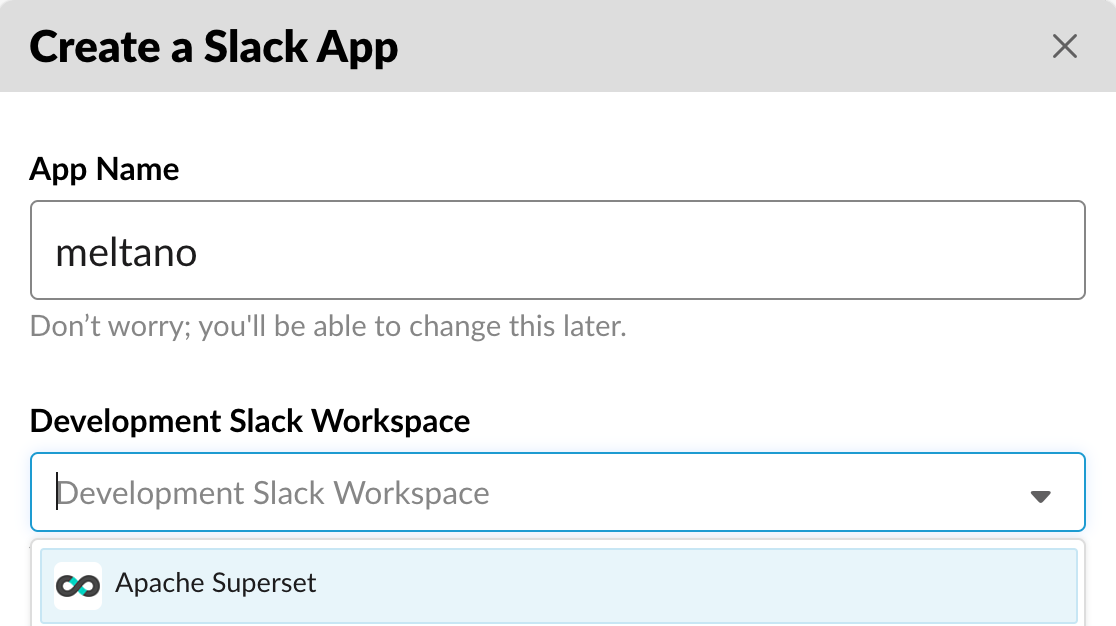
- Read the Terms of Service agreement and select I agree (if you agree!). Then select Create new app, give your app a memorable name, and select the workspace you want the app to have access to.
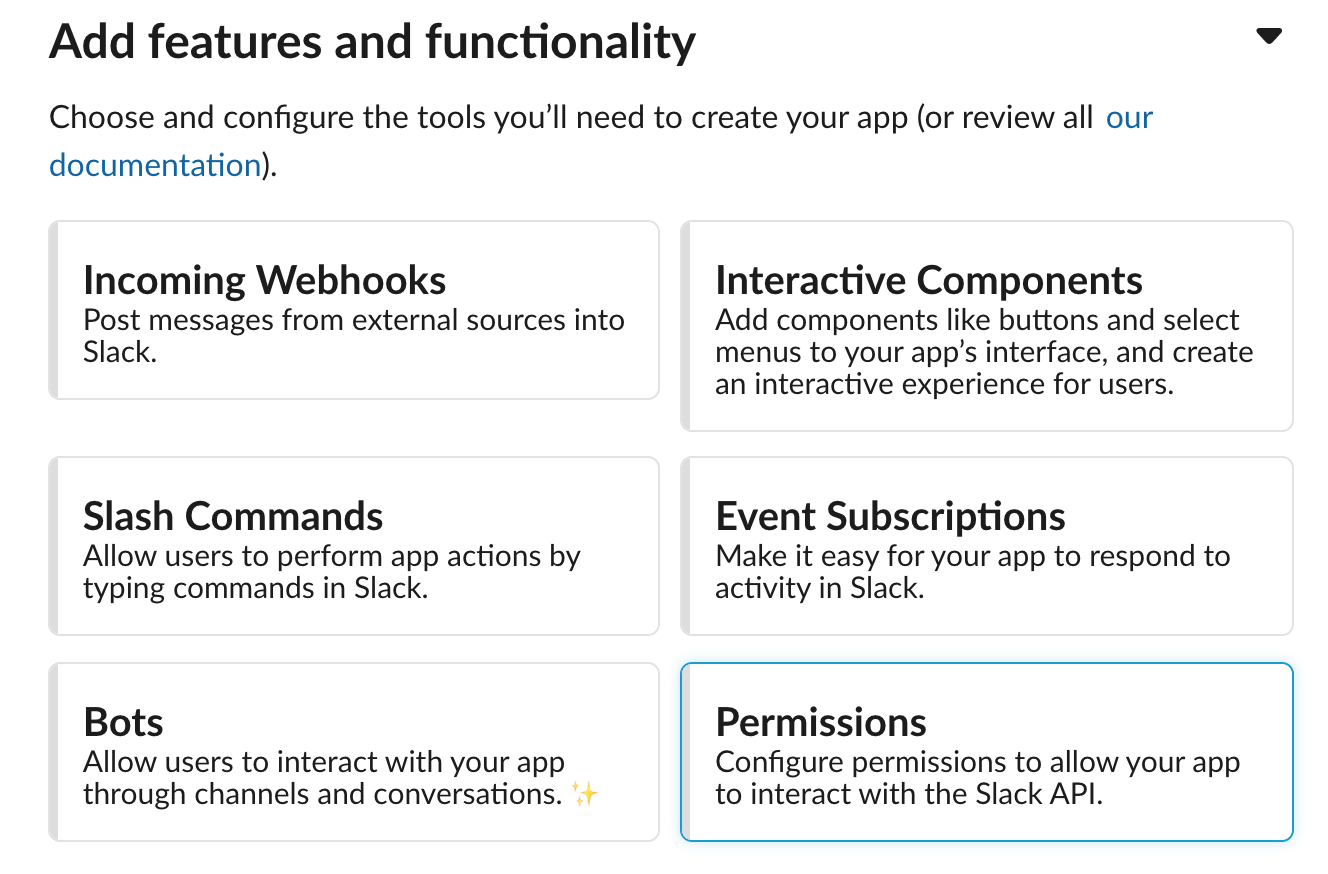
- Let's now give this app some permissions. Under Add features and functionality, select Permissions.
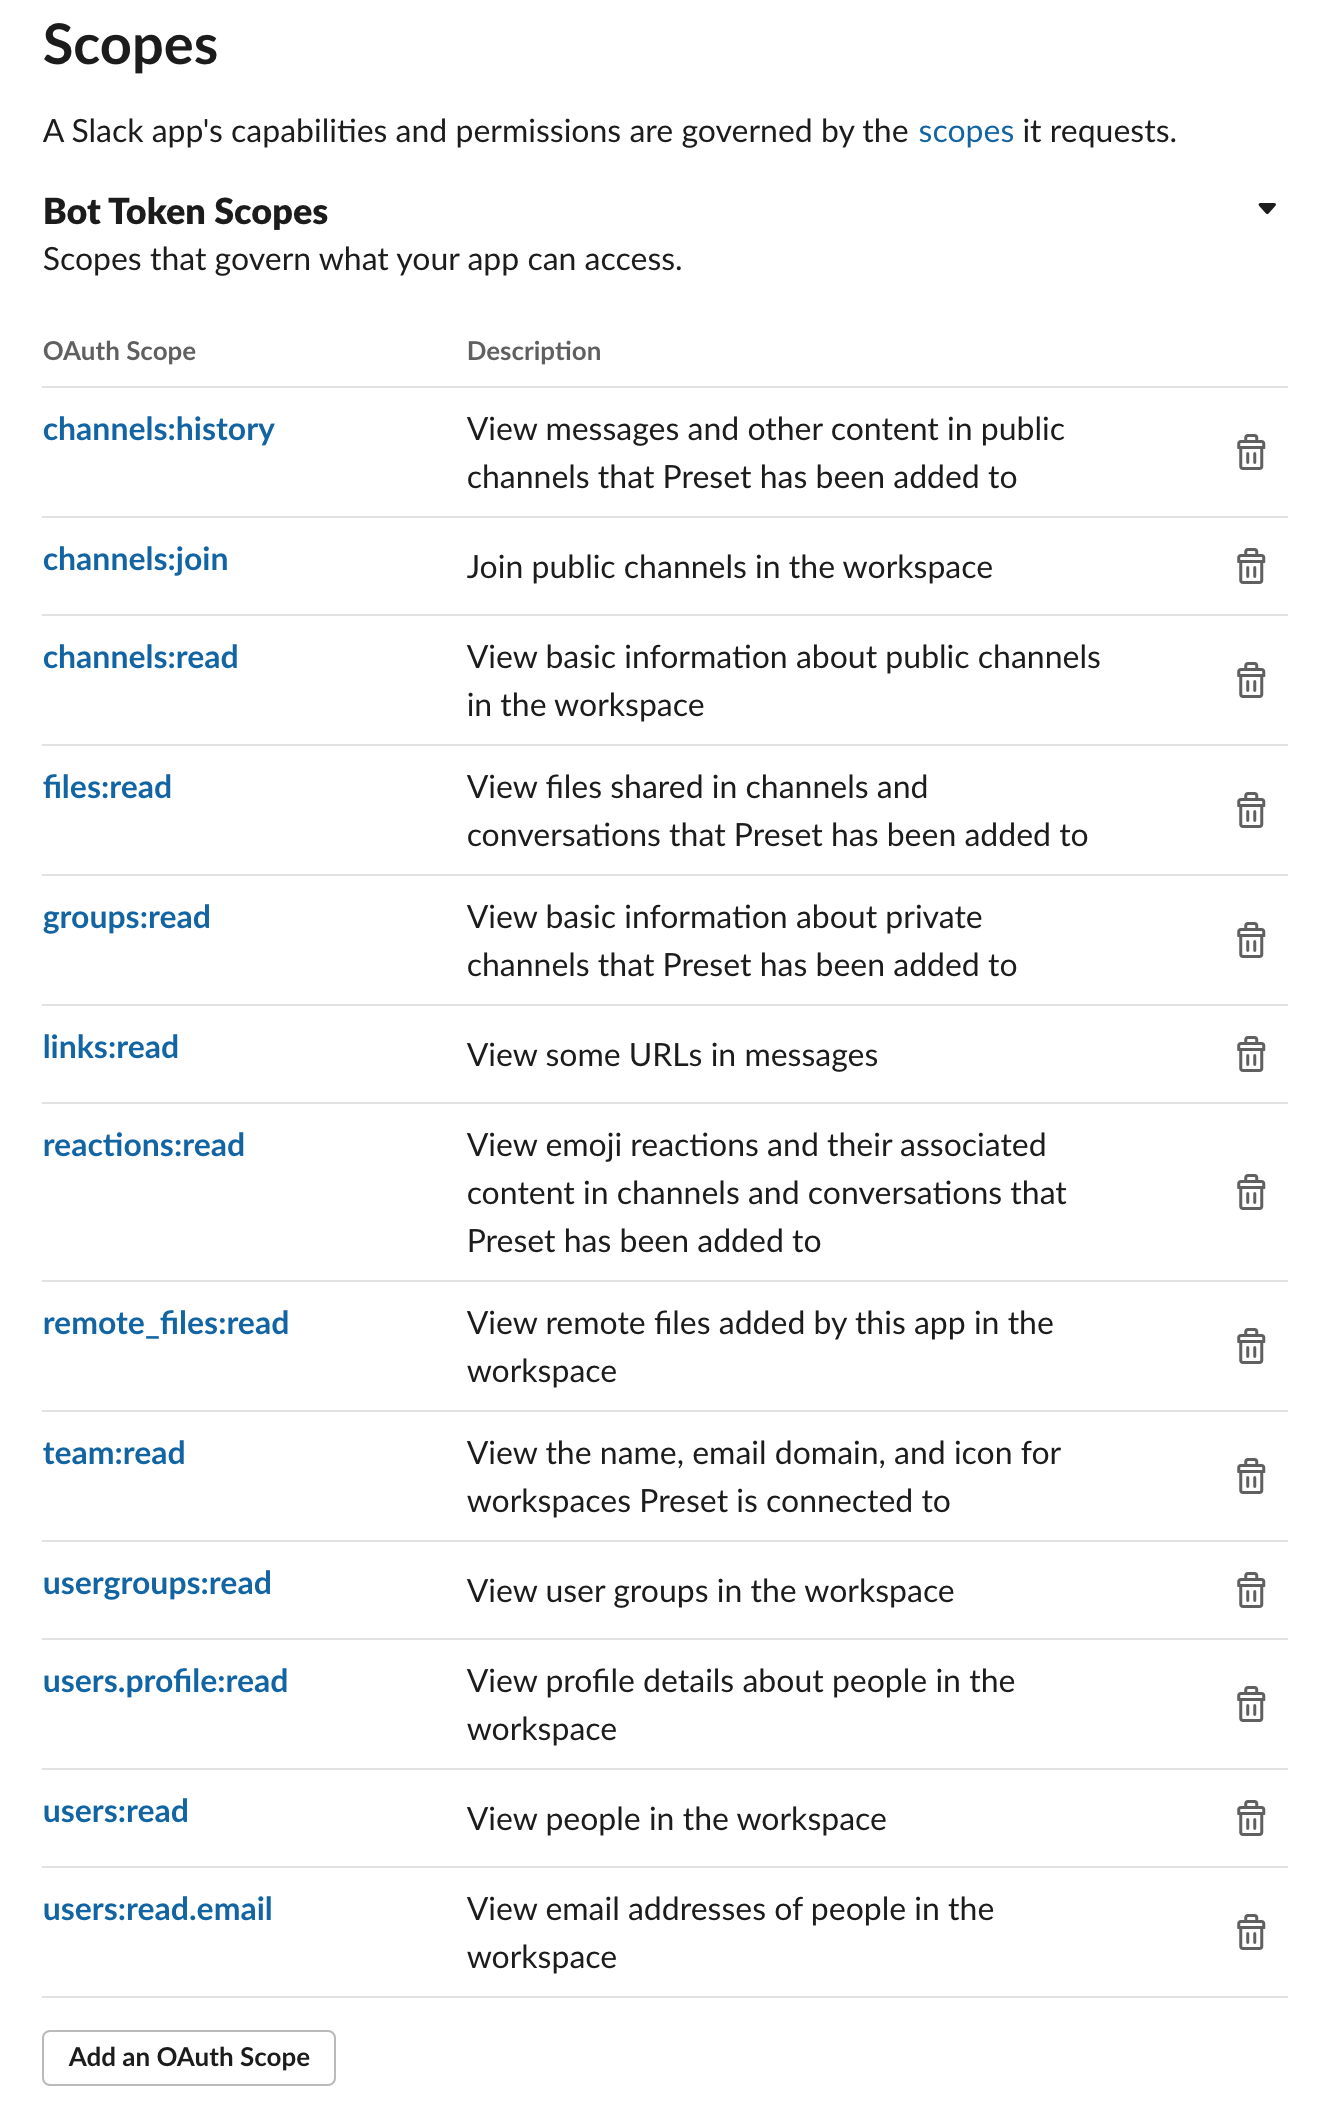
- We recommend giving the following permissions to this app.
- Then, let's add the app to the workspace by clicking Install App to Workspace.
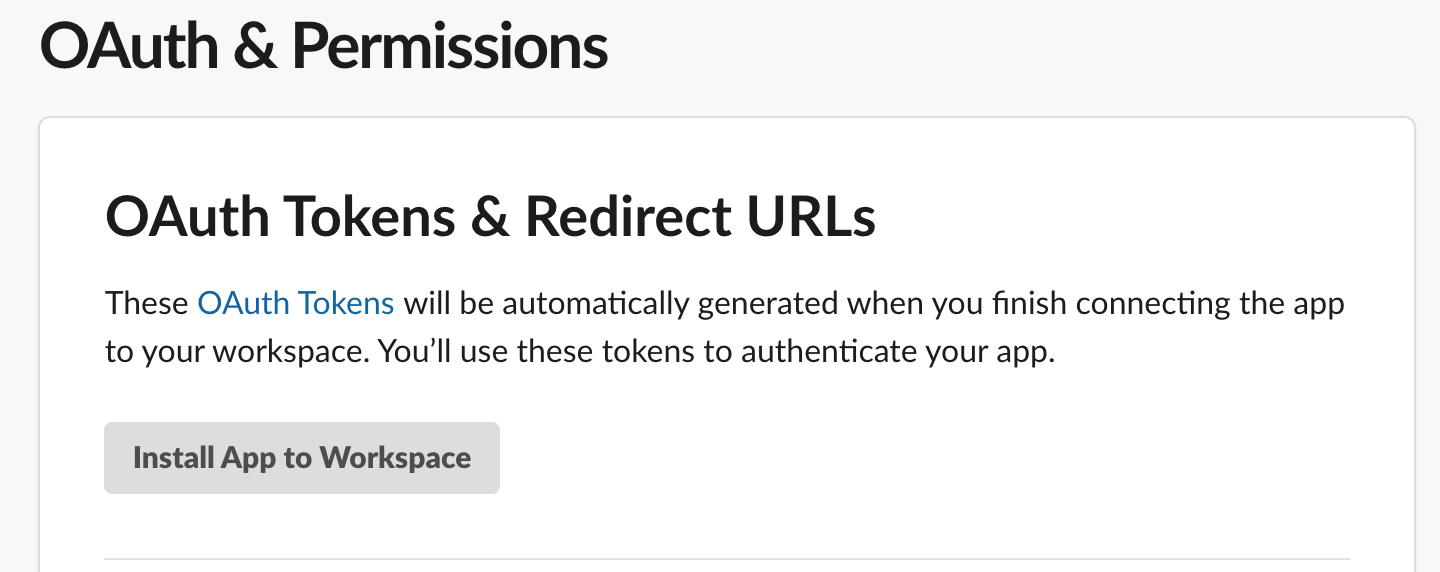
Once it's installed, you'll see a Bot User OAuth Access Token. This is what we need for the Meltano system to be able to extract data from our workspace. Before Meltano can extract useful data from the Slack workspace, we need to add our app to all of the public channels we want to pull data from.
Open each public channel in your community Slack and run the following command:
/invite @[app_name]If your app was named meltano, you would type the following to add the app to the channel:
/invite @meltanoTo wrap up this section, save your OAuth Access Token in a safe place. We'll need this later in this tutorial.
Installing and Initializing Meltano
Meltano's website has the full instructions on how to install Meltano and their documentation is amazing! We'll cover the abridged version here!
-
Meltano is a Python 3 library that can be installed using
pip(orpip3based on your setup). First, create a directory for your Meltano projects andcdinto it.mkdir meltano-projects cd meltano-projects -
Using a Python virtual environment local to this project folder is highly recommended (use
python3instead if that's linked to your Python 3 version).python -m venv .venv source .venv/bin/activate -
Install the Meltano library.
pip install meltano -
You now should have the
meltanocommand available in your command line now. We're now ready to initialize a Meltano project.meltano init slackYou should see a flurry of output. Take a look at the files Meltano created.
Created slack
Creating project files...
Created slack/meltano.yml
Created slack/README.md
Created slack/requirements.txt
Created slack/.gitignore
Created slack/model/.gitkeep
Created slack/extract/.gitkeep
Created slack/load/.gitkeep
Created slack/transform/.gitkeep
Created slack/analyze/.gitkeep
Created slack/notebook/.gitkeep
Created slack/orchestrate/.gitkeep
Creating system database...
This is one of the reasons Meltano works really well with version control, CI/CD, and other common web development workflows.
Installing the Slack Extractor
To extract data from a 3rd party API, Meltano needs extractor libraries. These are Python libraries that target the Singer spec and can usually be installed using pip.
Meltano comes with a few extractors out of the box, but not one for extracting data from Slack.
-
First things first, open the folder that Meltano created for our project.
cd slack -
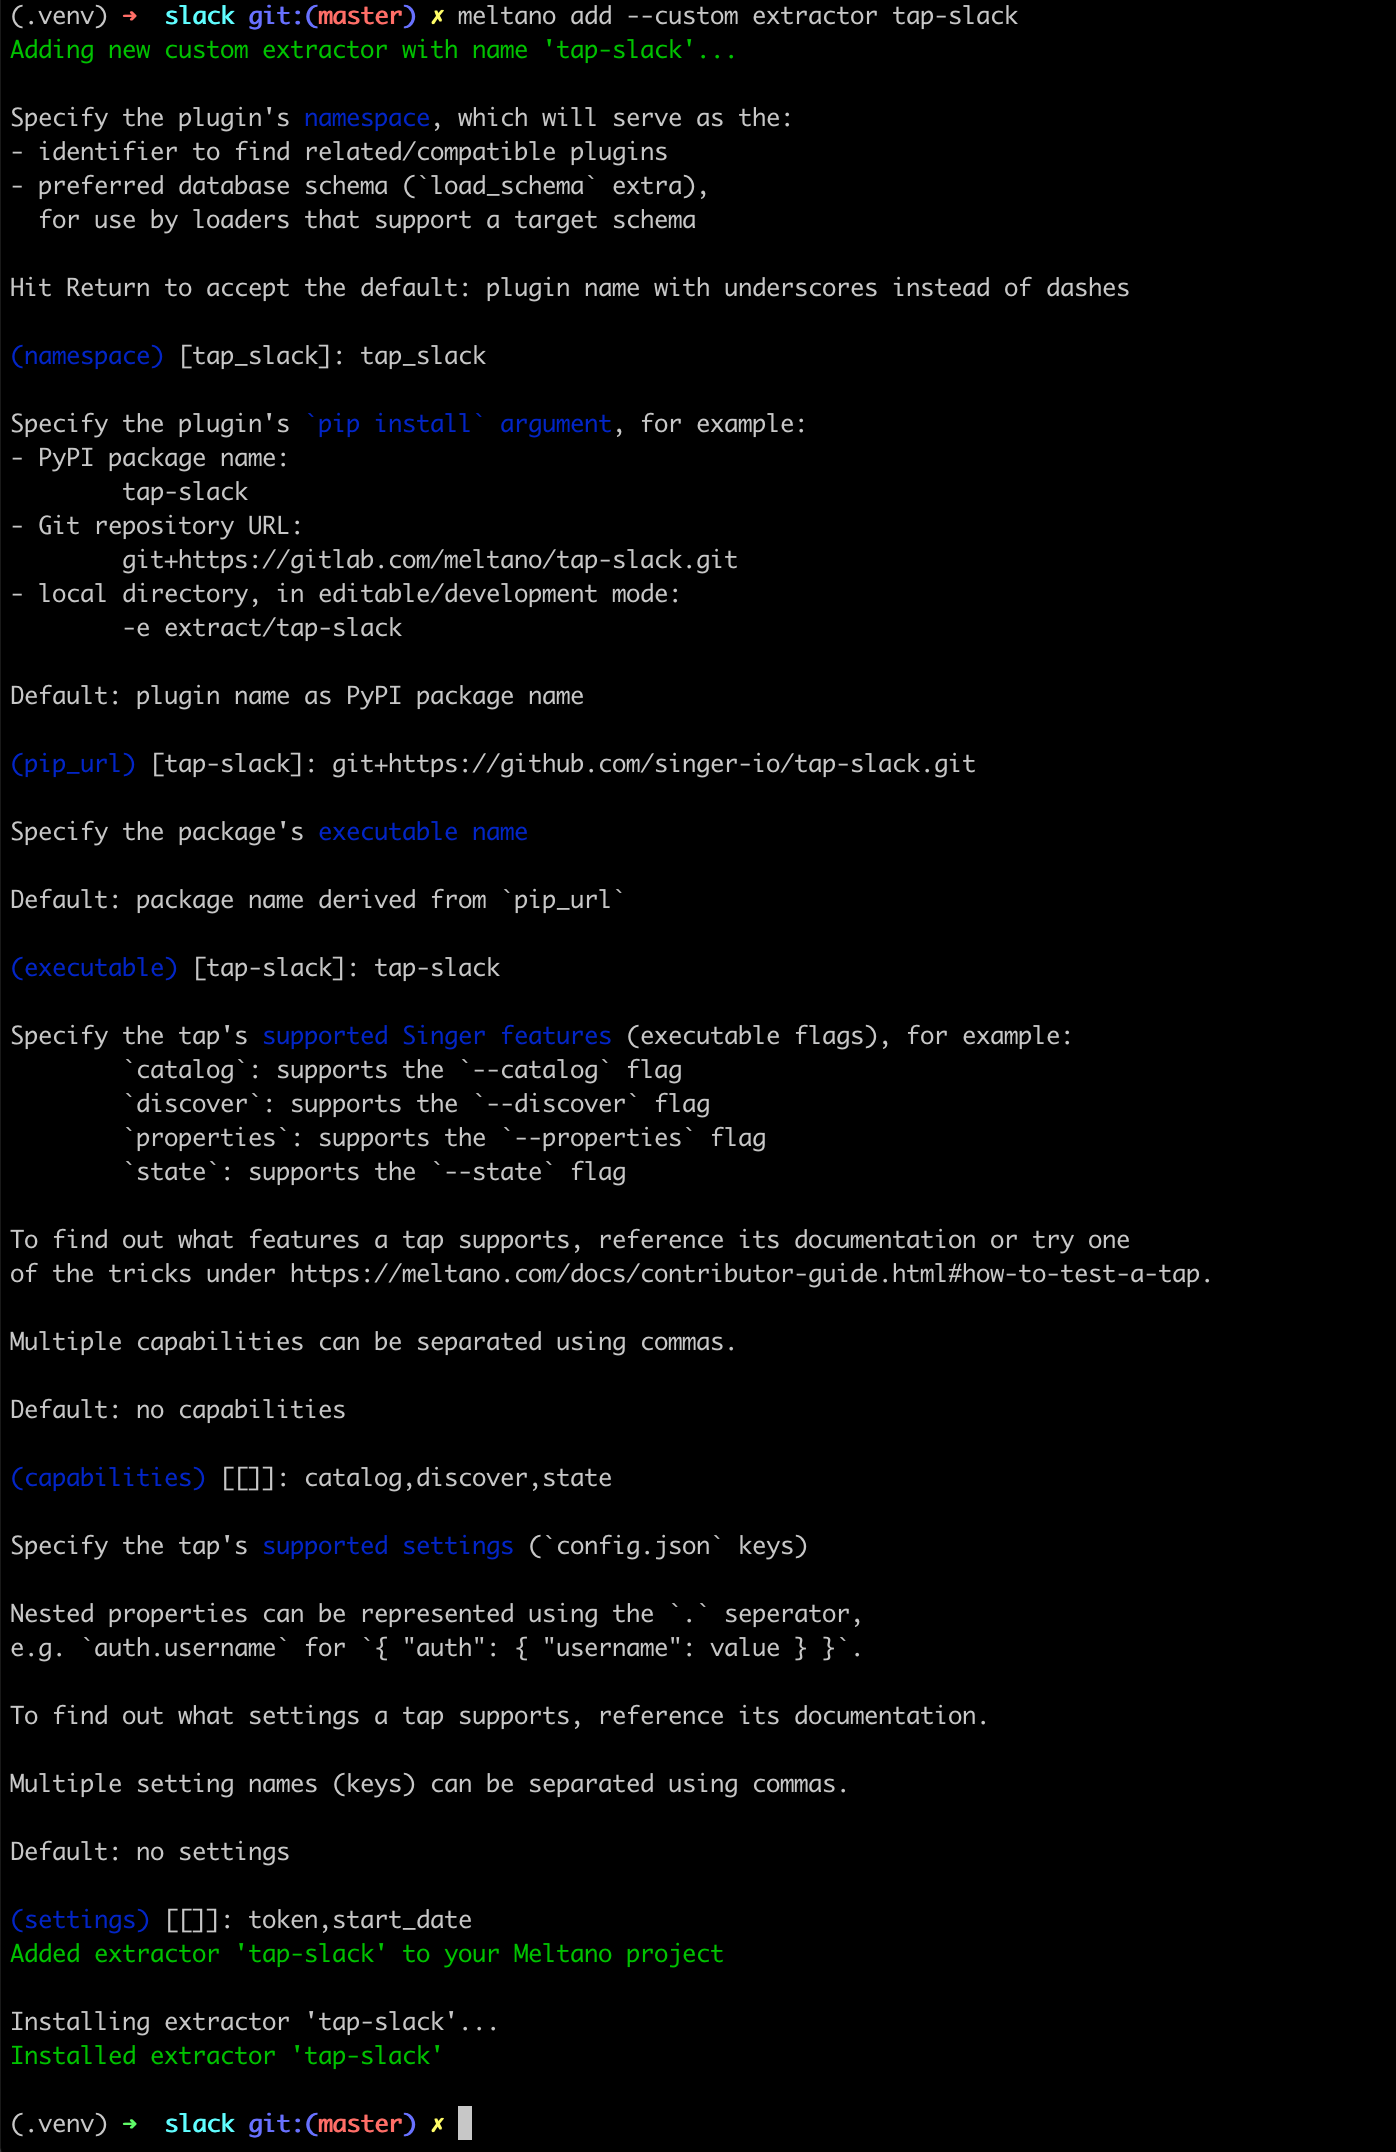
We'll need to install the community extractor library for Slack, called tap-slack. Adding any library or capabilities to a Meltano project is done using the
meltano addcommand:meltano add --custom extractor tap-slackMeltano will launch a step-by-step wizard that lets us provide the necessary context (upto date Meltano documentation here).
We recommend the following options:
- (namespace):
tap_slack - (pip_url):
git+https://github.com/singer-io/tap-slack.git - (executable):
tap-slack - (capabilities):
catalog,discover,state - (settings):
token,start_date
Here's a summary screenshot for your convenience:
- (namespace):
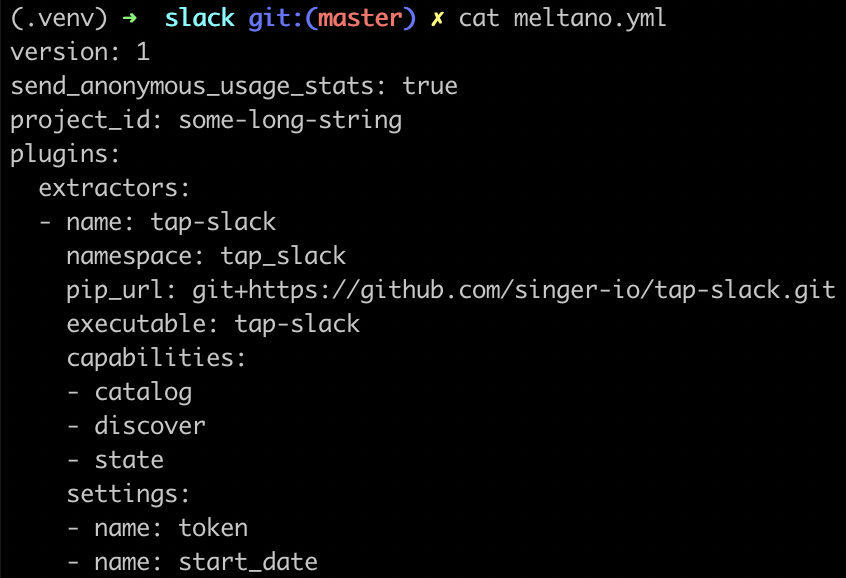
- For a visual confirmation, you can inspect the
meltano.ymlfile.
-
By default, Meltano will instruct extractors like
tap-slackto extract all of the entities and attributes specified in the extractor's catalog.You can run the following command to list all of the attributes Meltano will extract by default:
meltano select --list --all tap-slack
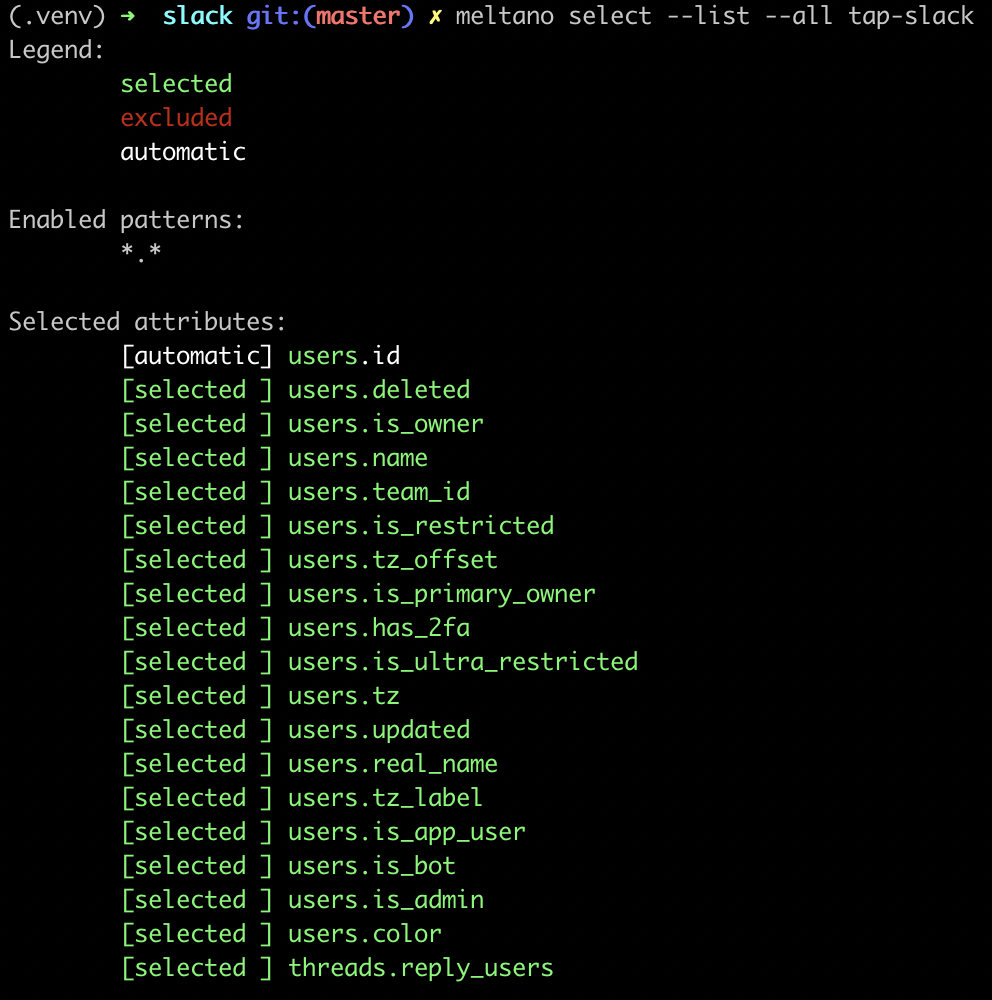
You can exclude specific entities and attributes if you'd like using: meltano select tap-slack <entity> <attribute>For example, the following command will instruct Meltano to not extract `teams.plan`: meltano select tap-slack --exclude teams plan-
To finish up configuration, we need to set the
tokenandstart_dateparameters that we specified to Meltano during the extractor setup wizard.If you run
meltano config tap-slack, you'll notice that these values are set tonull:{ "token": null, "start_date": null }Before configuring the
tokenvalue, we recommend instructing Meltano to save this OAuth token in.envinstead of as plain-text inmeltano.yml(which is recommended practice). This can be accomplished by openingmeltano.ymland editing thesettingssection to match the following:plugins: extractors: - name: tap-slack namespace: tap_slack pip_url: git+https://github.com/singer-io/tap-slack.git executable: tap-slack capabilities: - catalog - discover - state settings: - name: token kind: password - name: start_date -
Now, let's set the
tokenvalue, use the following command:meltano config tap-slack set token xoxb-22342-oauth1-token2-etcRecall that the OAuth token comes from the Slack App page from earlier in this post.
-
Finally, you need to set the
start_datevalue. This represents the earliest datetime value you want for data like messages and channels synced (all users will be synced regardless of this value).meltano config tap-slack set start_date 2020-09-01We recommend picking a recent start date (
2020-09-01at the time of writing is the start of the current month) to test the pipeline.
Syncing Slack Data
Now that we have all of the pieces setup, we just need to configure the destination for the data extracted from Slack. To test the extraction, let's load the data as JSON to a local folder.
To recap on Singer and Meltano vocabulary:
- data extraction from an API: Singer
tapsor Meltanoextractors - data loading to a destination: Singer
targetsor Meltanoloaders
Meltano comes with target-jsonl out of the box, which stands for JSON lines. Let's use this for testing our pipeline.
-
You can add
target-jsonlusing a single command:meltano add loader target-jsonl -
Create a directory called
outputfortarget-jsonlto dump to.mkdir -p output
To test our pipeline we can run the following, beautiful command and watch as Meltano coordinates the orchestra of commands needed for this pipeline.
meltano elt tap-slack target-jsonl --job_id=blogpostLet's break down the different components of the command while we wait for the data pipeline to finish:
meltano elt: ELT stands for Extract-Load-Transform and this command lets us specify we want an ELT job to runtap-slack: extract data from Slack, using the associated credentials and settings we specifiedtarget-jsonl: load data to a local folder, as JSON files--job_id=blogpost: Meltano pipelines often generate state and that state is linked to thejob_idwe specified. To re-run the data pipeline in an incremental fashion (only sync the changes), we can just re-run the same exact command using the same exactjob_id.
The Meltano library will output a lot of logs to the terminal as it's running. The most common error we ran into was a timeout error because the Slack API couldn't be reached.
Slack will pretty aggressively throttle lots of inbound API requests (especially on the free plan), but thankfully the Meltano system was designed to gracefully back off and try again with a time delay. With some patience, you should see the delightful success logs once the data is finished extracting and finished loading (to the folder locally).
You should see lots of colorful output from Meltano as it runs through the full data pipeline.

The data you're looking for will live in output/:

Next Steps
In this post, we performed a deep dive into how to configure Meltano extracting data from Slack and loading into a local folder of JSON files.
In part 2 of this blog post series, we discuss how to build the Superset dashboard we teased earlier in the post.
